
Adding Intelligence to Your Blazor Applications with Smart Components

Summarize with AI:
Learn how to add AI to your Blazor applications with .NET Smart Components.
In this article, you will learn about .NET Smart Components, a very original and productive way to integrate artificial intelligence into forms within our applications that can undoubtedly be very helpful to end users. Let’s get started!
What Are Smart Components?
.NET Smart Components demonstrate how to quickly add AI features to .NET applications. They are a series of components that you can add to Blazor applications or MVC/Razor page-based applications to enable operations using artificial intelligence, such as filling in form fields from information on the clipboard. One of the purposes of Smart Components is to inspire future projects that implement artificial intelligence and help users, like the project I did with .NET MAUI AI Prompt Control from Progress Telerik.
Testing .NET Smart Components
The easiest way to test Smart Components is by downloading or cloning the project from the official GitHub repository. Once you have it open in Visual Studio 2022, you need to configure the parameters of the LLM that you will use for the Smart Components. Examining the code, you will see in the file Smart Components | src | SmartComponents.Inference.OpenAI | ApiConfig.cs that the LLM values are retrieved as follows:
internal class ApiConfig
{
    public string? ApiKey { get; }
    public string? DeploymentName { get; }
    public Uri? Endpoint { get; }
    public bool SelfHosted { get; }

    public ApiConfig(IConfiguration config)
    {
        var configSection = config.GetRequiredSection("SmartComponents");

        SelfHosted = configSection.GetValue<bool?>("SelfHosted") ?? false;

        if (SelfHosted)
        {
            Endpoint = configSection.GetValue<Uri>("Endpoint")
                ?? throw new InvalidOperationException("Missing required configuration value: SmartComponents:Endpoint. This is required for SelfHosted inference.");

            // Ollama uses this, but other self-hosted backends might not, so it's optional.
            DeploymentName = configSection.GetValue<string>("DeploymentName");

            // Ollama doesn't use this, but other self-hosted backends might do, so it's optional.
            ApiKey = configSection.GetValue<string>("ApiKey");
        }
        else
        {
            // If set, we assume Azure OpenAI. If not, we assume OpenAI.
            Endpoint = configSection.GetValue<Uri>("Endpoint");

            // For Azure OpenAI, it's your deployment name. For OpenAI, it's the model name.
            DeploymentName = configSection.GetValue<string>("DeploymentName")
                ?? throw new InvalidOperationException("Missing required configuration value: SmartComponents:DeploymentName");

            ApiKey = configSection.GetValue<string>("ApiKey")
                ?? throw new InvalidOperationException("Missing required configuration value: SmartComponents:ApiKey");
        }
    }
}
In the code above, you can see that it first validates whether a local LLM such as Ollama is being used; otherwise, it retrieves data such as Endpoint, DeploymentName and ApiKey, which can be configured with data from an OpenAI or Azure OpenAI account.
This configuration is taken from the project where the Smart Components will be used. In my case, since I want to experiment with Blazor, I need to configure the file SmartComponents | Samples | ExampleBlazorApp | appsettings.json by adding the LLM configuration for Azure OpenAI, as follows:
{
  "Logging": {
    "LogLevel": {
      "Default": "Information",
      "Microsoft.AspNetCore": "Warning"
    }
  },
  "SmartComponents": {
    "ApiKey": "your-api-key",
    "DeploymentName": "your-deployment-name",

    // Required for Azure OpenAI only. If you're using OpenAI, remove the following line.
    "Endpoint": "your-endpoint"
  },
  "AllowedHosts": "*"
}
Once the project is configured with the information above, you can run it, which will appear as follows:
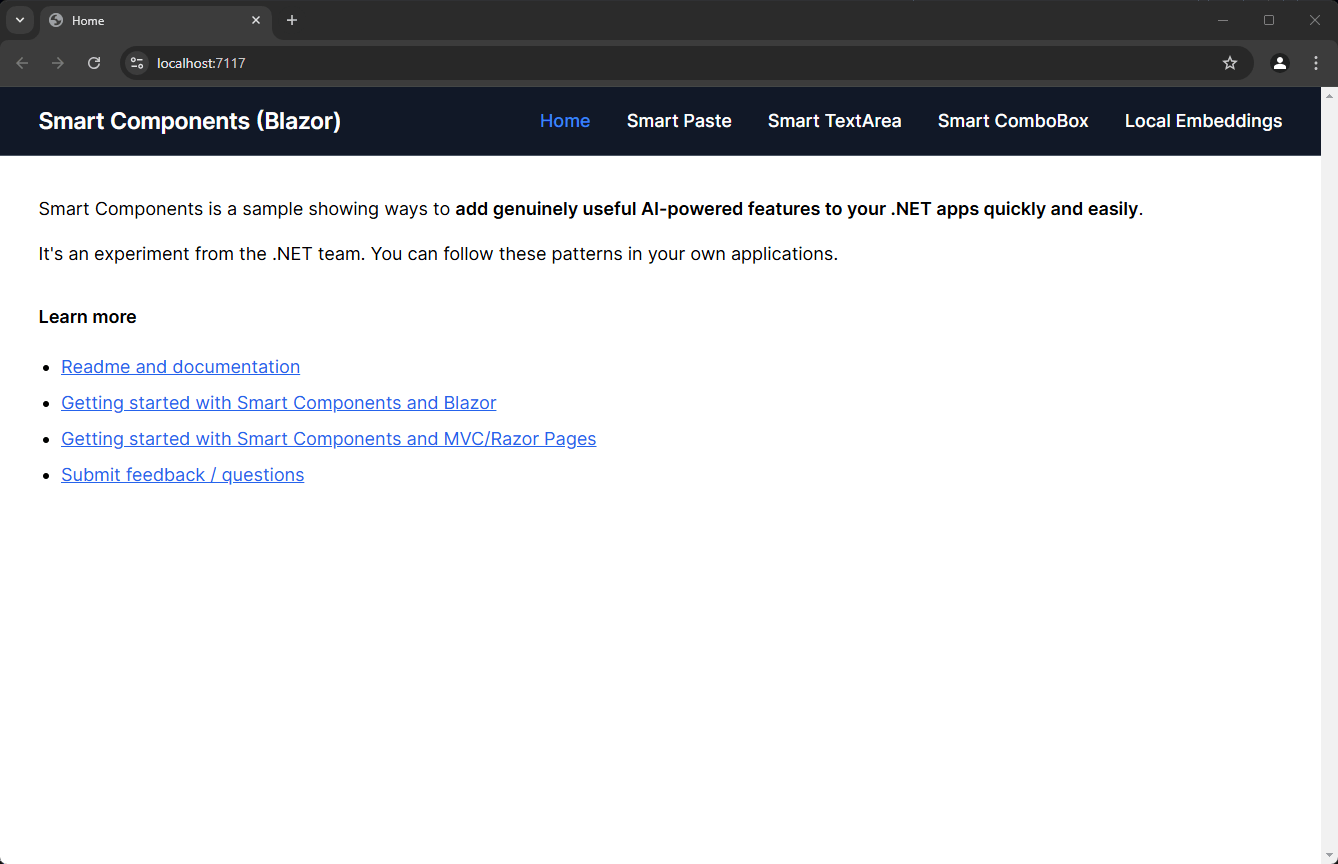
Let’s examine the .NET Smart Components one by one.
The .NET Smart Component Smart Paste
The first Smart Component we will analyze is Smart Paste. This is a button that allows you to automatically fill in form information based on the user’s clipboard content. In the examples, it lets us fill out information for a basic form (Name and Age), a Mail Address form and a Bug Report form.
For example, we can copy a GitHub Issue like the following to the clipboard:
Now that Microsoft.Extensions.AI.Abstractions is published, we should replace IInferenceBackend with IChatClient. This should also allow us to remove SmartComponents.Inference.OpenAI completely, as the code here would instantly work with any LLM backend that has a corresponding IChatClient.
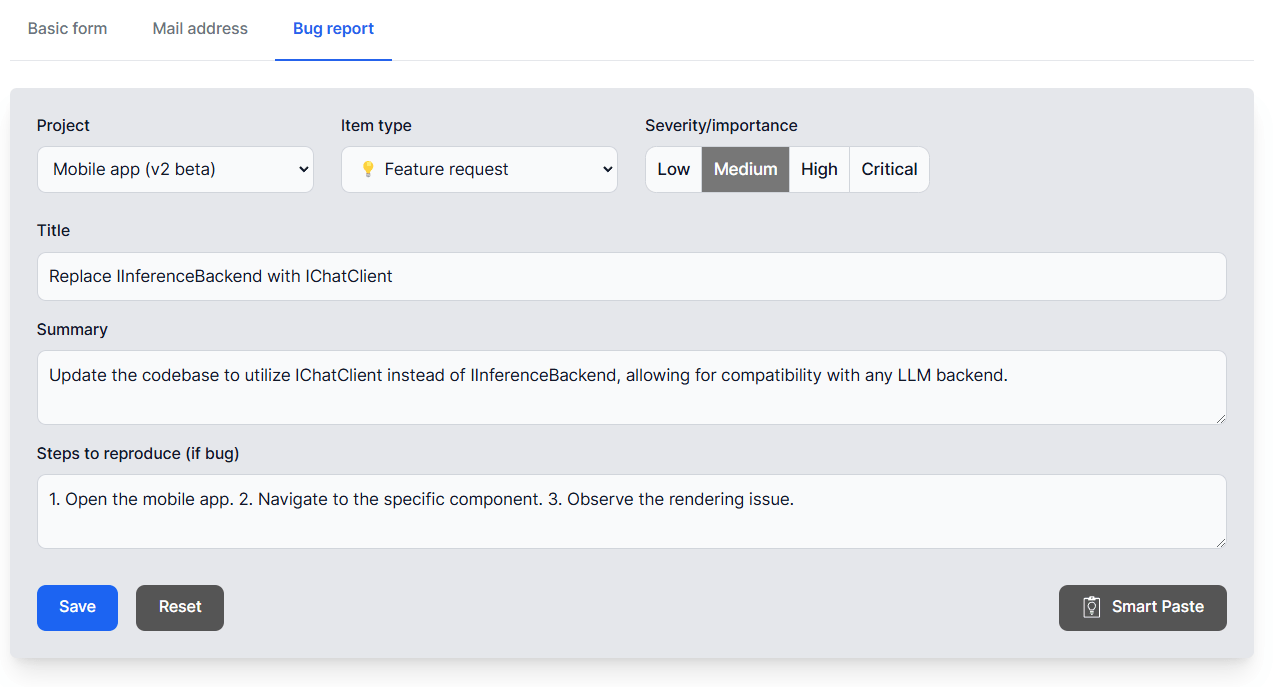
Then, if we go to the Bug Report example and press the Smart Paste button, we can see how the form information is automatically filled in:
The .NET Smart Component Smart TextArea
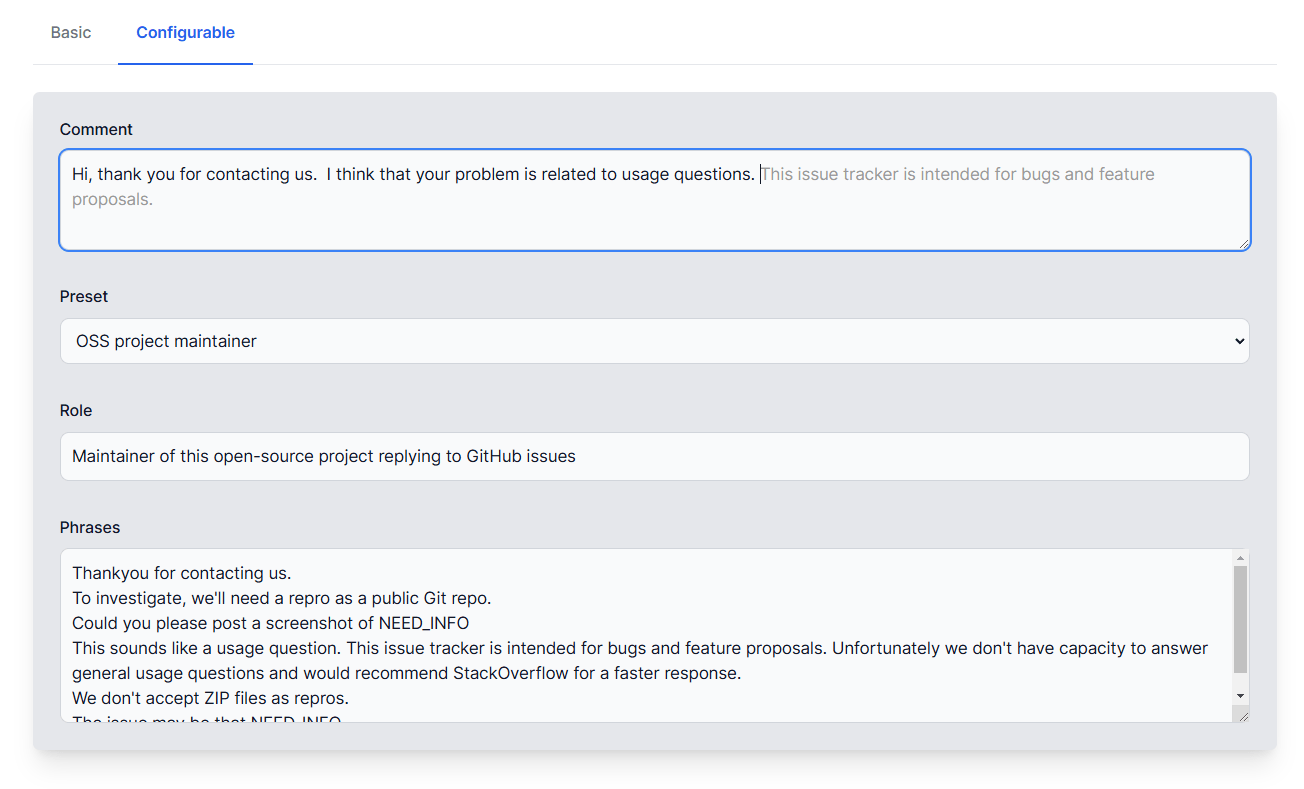
The next Smart Component is the Smart TextArea, which is an upgrade to a traditional textarea using AI. This component allows you to complete suggested sentences provided by AI, with the advantage that you can guide completion using your own sentences, tone, policies, URLs, common phrases, etc. This can be very useful if you want your users to quickly complete responses, for example, when replying to customers based on predefined information.
In the application example, a basic demo and one that allows you to configure completion parameters are shown. These parameters let you predefine information such as the preset, the role of the person responding to a message and a set of common phrases that the user can use to create quick responses. Below is an example of the form being filled out based on the configured information:
The .NET Smart Component Smart ComboBox
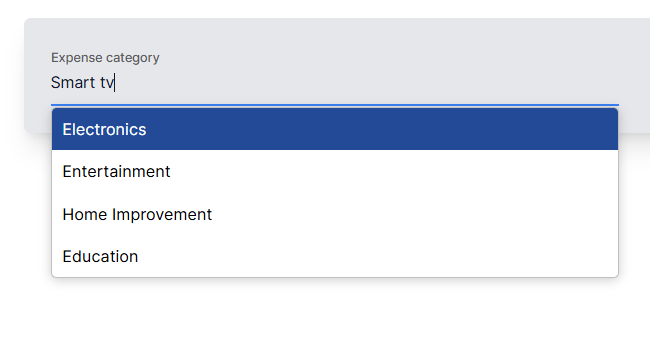
The Smart ComboBox component has the unique feature of providing suggestions based on semantic matching instead of substring searching. This means that suggestions related to the entered term will be displayed, even if they do not exactly match the values in the ComboBox.
In the following example, you can see how in the Expense category, the term Smart TV suggests the item Electronics as the first option, even though the term Smart TV is not part of the ComboBox items:
This component can undoubtedly save users a lot of headaches.
Local Embeddings
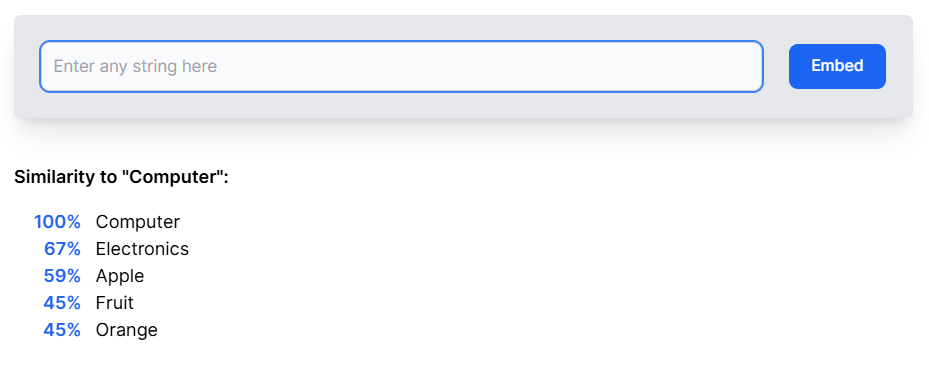
Unlike the visual components we have seen earlier, Local Embeddings do not have a graphical interface as such. Their utility lies in calculating the semantic similarity between two natural language strings, enabling the closest match from a set of candidates to be found.
Similarly, unlike previous components, this evaluation is performed directly on the CPU, so no external AI provider is used. In the following example, you can see how for the term Computer, there is greater similarity to the term Electronics than to the other terms previously entered:
Integrating .NET Smart Components into a Blazor Project
What would an article be without a demonstration of how to use the .NET Smart Components in your own projects? To do this, the first thing you need to do is create a new project. In my case, I used the Blazor Web App template with an Interactive render mode set to Server and Interactivity location set to Per page/component.
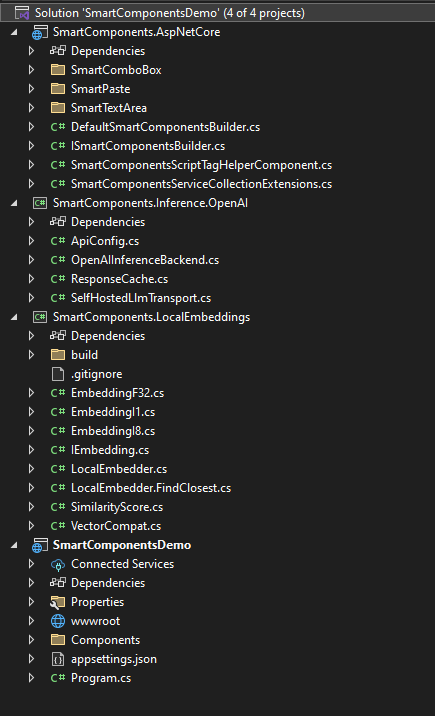
Once you have created the project, you need to add the following references to your solution, which are part of the SmartComponents project:
- SmartComponents.AspNetCore
- SmartComponents.Inference.OpenAI
- SmartComponents.LocalEmbeddings
Once added, your solution should look like this:
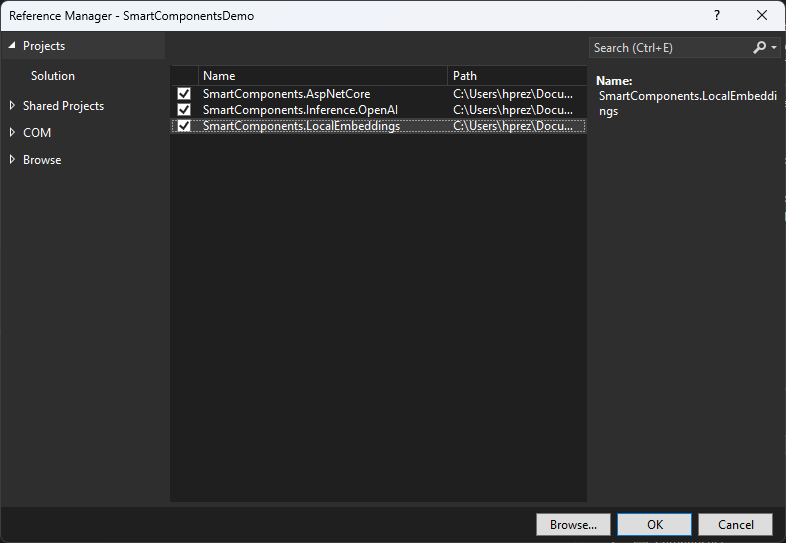
After adding the projects to the solution, you need to reference them by right-clicking on the Blazor project | Add | Project Reference, and finally checking all the projects in the window that appears:
Now that you have added the references to the .NET Smart Components projects, let’s see how to use them.
Configuring the Blazor Project to Use Smart Components
Before you can use the Smart Components in your project, you need to configure the Program.cs file of your Blazor project. First, you must add the SmartComponents service using the AddSmartComponents method, as well as add a Singleton instance of LocalEmbedder to use local embeddings as follows:
var builder = WebApplication.CreateBuilder(args);
...
builder.Services.AddSmartComponents()
    .WithInferenceBackend<OpenAIInferenceBackend>()
    .WithAntiforgeryValidation();

builder.Services.AddSingleton<LocalEmbedder>();

var app = builder.Build();
In the above code, you can also see that an inference backend based on OpenAI or Azure OpenAI has been specified. This instance will take the values from the configuration file specified in the configuration file to use the desired LLM service.
Remember that the LLM configuration is found in the appsettings.json file of your Blazor project, which should look like this with your own information:
{
  "Logging": {
    "LogLevel": {
      "Default": "Information",
      "Microsoft.AspNetCore": "Warning"
    }
  },
  "SmartComponents": {
    "ApiKey": "your-api-key",
    "DeploymentName": "your-deployment-name",

    // Required for Azure OpenAI only. If you're using OpenAI, remove the following line.
    "Endpoint": "your-endpoint"
  },
  "AllowedHosts": "*"
}
With the above configuration, we are ready to create forms that use Smart Components.
Integrating the Smart Paste Component into a Blazor App
To test the Smart Paste component, let’s assume we have a form that allows users to submit proposals for giving a talk. I have created a page-type component called Sessions.razor using Progress Telerik UI for Blazor controls for speed, which has the following code:
@page "/new-session"
@using SmartComponents

<h3>New Session</h3>

<EditForm Model="@session" OnValidSubmit="@HandleValidSubmit" class="p-3 rounded border shadow-sm">
    <DataAnnotationsValidator />
    <ValidationSummary class="text-danger" />

    <div class="mb-3">
        <TelerikTextBox Id="Title" Placeholder="Title" @bind-Value="session.Title" />
    </div>

    <div class="mb-3">
        <TelerikTextArea id="Description" Placeholder="Description" @bind-Value="session.Description" Rows="3" />
    </div>

    <div class="mb-3">
        <TelerikTextBox Id="Speaker" Placeholder="Speaker" @bind-Value="session.Speaker" />
    </div>

    <TelerikButton ButtonType="ButtonType.Submit">
        Submit
    </TelerikButton>
</EditForm>

@if (submitted)
{
    <p>Session submitted successfully!</p>
}

@code {
    private Session session = new Session();
    private bool submitted = false;

    private void HandleValidSubmit()
    {
        submitted = true;
    }

    public class Session
    {
        public string Title { get; set; }
        public string Description { get; set; }
        public string Speaker { get; set; }
    }
}
The previous code could correspond to any form you have created previously. The beauty of .NET Smart Components is that you can add them by just adding a bit of code. In our example, just add the SmartPasteButton component as follows:
<EditForm Model="@session" OnValidSubmit="@HandleValidSubmit" class="p-3 rounded border shadow-sm">
    ...
    <TelerikButton ButtonType="ButtonType.Submit">
        Submit
    </TelerikButton>
    <SmartPasteButton DefaultIcon class="default-button secondary" />
</EditForm>
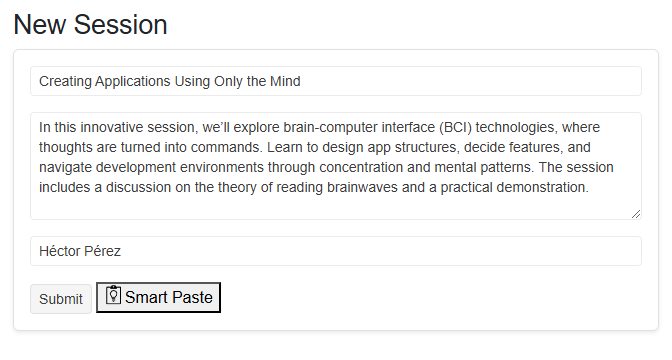
Once added, you can go to the component’s page, copy the following test text and click the Smart Paste button to see how the information is automatically filled:
I’m Héctor Pérez. Today we’re going to explore a truly innovative session: we’ll learn how to create applications using only the mind. Yes, you heard that right. In this class, we’ll dive into brain-computer interface (BCI) technologies, where thoughts are turned into commands. Imagine designing the structure of an app, deciding its features, and navigating the development environment—all without lifting a finger, simply through the power of your concentration and mental patterns. We’ll not only discuss the theory behind reading brainwaves and their interpretation but also have a practical demonstration so you can see how your thoughts can bring a functional app to life. It’s an exciting leap into the future of programming!
Integrating the Smart TextArea Component
Let’s now see how to use the Smart TextArea component. To do this, you can create a new Blazor page and fill it with the following code:
<h3>SmartAreaTest</h3>

<form class="w-100 bg-light p-4 rounded shadow mb-4">
    <div class="mb-3">
        <h4 class="fw-semibold mb-2">Employee enquiry</h4>

        <label for="comment" class="form-label">Response:</label>
        <div class="w-100">
            <TelerikTextArea Class="form-control w-100"
                             @bind-Value="@comment"
                             Rows="4"
                             Id="Response" />
        </div>
    </div>
</form>

@code {

}
We will modify this page to integrate Smart TextArea. What we’ll do is replace the TextArea with a SmartTextArea component, assigning a UserRole, some UserPhrases and a bind-value to indicate the variable used to complete the text:
@page "/smarttextareatest"
<h3>SmartAreaTest</h3>

<form ...>
    <div class="grid mb-5">
        ...

        <div class="w-100">
            <SmartComponents.SmartTextArea class="form-control w-100"
                                           UserRole="@userRole"
                                           UserPhrases="@userPhrases"
                                           @bind-Value="@comment" />
        </div>
    </div>
</form>

@code {
    private string? comment;
    private readonly string userRole = "You are a technical expert who handles support tickets at a hosting company.";
    private readonly string[] userPhrases =
    {
        "Thank you for reaching out to our support team.",
        ...
    };

}
When you run the previous code, you will see how you can quickly complete the text box using the previously specified information:
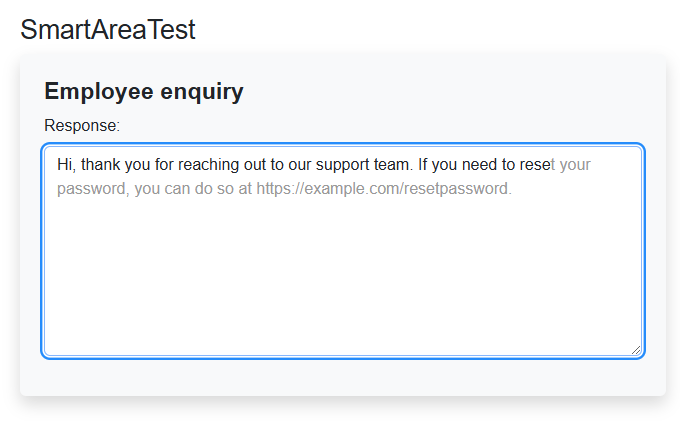
Now, let’s see how to integrate a Smart ComboBox into the Blazor project.
Integrating the Smart ComboBox Component
To test the last Smart Component, we will create a new Blazor page with the following base code:
@page "/"

<h3>Categories</h3>


<form class="default-form rounded-md bg-gray-200 p-6 shadow-xl mb-12 grid gap-12 md:grid-cols-2">
    <div class="floating-placeholder" data-permanent="combo-box-example">

        <label for="expense-category">Expense category</label>
    </div>
</form>

@code {

}
To add a Smart ComboBox, we’ll add the component, leaving the Url property empty for now:
    <div class="floating-placeholder" data-permanent="combo-box-example">
        <SmartComponents.SmartComboBox Url="" />
        <label for="expense-category">Expense category</label>
    </div>
We left the Url property empty because, somewhere in the project, semantic comparison must be done between the term entered by the user and a set of predefined categories.
To do this, we first go to Program.cs to add an embedder, the list of categories, and the URL used for semantic comparison, which uses the FindClosest method to achieve this:
var builder = WebApplication.CreateBuilder(args);
...

var embedder = app.Services.GetRequiredService<LocalEmbedder>();

var issueCategories = embedder.EmbedRange(
    ["Server Downtime", "DNS Issues", "SSL Certificate", "Billing", "Account Suspension", "Resource Limits", "Email Issues", "Database Errors", "Website Loading", "Malware Detection", "Backup and Restore", "Domain Transfer", "Nameserver Configuration", "Control Panel Access", "FTP Issues", "PHP Version", "Network Latency", "File Permissions", "Security Vulnerabilities", "DDoS Attack", "Migration", "Cron Job Failures", "Script Errors", "Server Maintenance", "Bandwidth Overuse", "Third-party Applications", "Website Optimization", "Cache Issues", "Spam Filtering", "Content Delivery Network (CDN)", "Other"]);

app.MapSmartComboBox("/api/suggestions/issue-label",
    request => embedder.FindClosest(request.Query, issueCategories));

app.Run();
With the above code added, we can return to the test page and complete configuring the Smart ComboBox, using the previously defined URL, as follows:
<form class="default-form rounded-md bg-gray-200 p-6 shadow-xl mb-12 grid gap-12 md:grid-cols-2">
    <div class="floating-placeholder" data-permanent="combo-box-example">
        <SmartComponents.SmartComboBox Url="api/suggestions/issue-label"
                                       id="issue-label"
                                       @bind-Value=@issueLabel />

        <label for="expense-category">Expense category</label>
    </div>
</form>

@code {
    string? issueLabel;
}
Before you attempt to run the project, there is one additional step to make the project work. You must copy the folder with the local Onix model, which allows local semantic comparison. This folder is found in the Smart Components project repository and is called LocalEmbeddingsModel, which you must paste into the folder of your project containing your application’s .exe file.
Once this is done, we can test the project, which will allow you to write a sentence to perform a semantic search within the ComboBox terms:
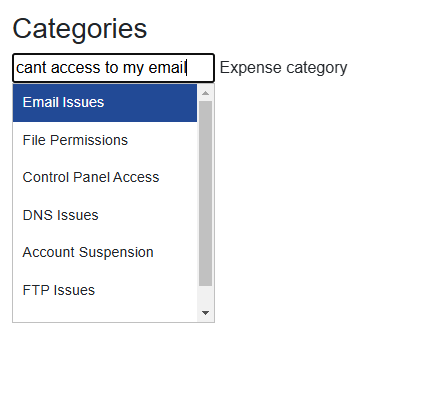
With this, we have seen that integrating .NET Smart Components into a Blazor project is quite simple.
Conclusion
Throughout this article, you have learned what .NET Smart Components are, how to test them quickly and finally how to integrate them into your own Blazor projects. Now it’s time to get to work and integrate them into your projects or find new ways to help end users using the power of AI.
Want to try out Telerik UI for Blazor? It comes with a free 30-day trial.

Héctor Pérez
Héctor Pérez is a Microsoft MVP with more than 10 years of experience in software development. He is an independent consultant, working with business and government clients to achieve their goals. Additionally, he is an author of books and an instructor at El Camino Dev and Devs School.
Related Posts
Comments
All articles
Topics
Web MobileMobile
Desktop
Design
Productivity
People
