
Analyzing ML Models with ML.NET and Blazor

Summarize with AI:
By combining Blazor’s interactive nature with ML.NET’s machine learning capabilities, you can create powerful web applications with advanced features like data analysis and prediction.
Integrating machine learning into .NET web applications is accessible thanks to the flexibility of the dotnet ecosystem. This series will explore how to seamlessly add ML.NET to a Blazor project, enabling you to harness the power of machine learning within your web applications.
This first article will show how to train, analyze and make predictions using ML.NET models. Through a web interface you will be able to see statistical data used to evaluate the effectiveness of your model and process predictions. Whether you’re a seasoned developer or just starting with Blazor and ML.NET, this series will provide you with the essential knowledge and practical steps to get started.
Technical Building Blocks
As you get started, make sure all the proper tooling is in place for development. You’ll need to install the latest .NET runtime, prerequisites for ASP.NET web development and ML.NET. Each set of libraries is part of .NET and can be installed through the Visual Studio installer or command line (CLI) as a workload.
.NET 8 and Up
.NET 8 is the latest long-term support (LTS) release of the .NET platform with support for a wide array of application scenarios through workloads. Installing .NET SDK Workloads enables application types within your project. In this scenario, you will use Blazor via ASP.NET and web development workload and ML.NET via the .NET desktop development workload.
Web Development with Blazor
Blazor is part of the ASP.NET Core, an open-source .NET framework for building web applications using HTML, CSS and C#. Blazor can be configured to run on the client’s browser using interactive WebAssembly or on the server. Since machine learning relies heavily on reading and writing files on disk, Blazor’s ability to run server-side is ideal for this scenario.
To develop with Blazor, you’ll need the ASP.NET and web development workload which is acquired through the Visual Studio installer. For detailed, step-by-step instructions, please refer to the official documentation.

ML.NET
ML.NET is a free, open-source and cross-platform machine learning framework developed by Microsoft for tight integration with the .NET ecosystem. ML.NET enables you to prepare data, train, analyze and deploy custom machine learning models using .NET. It supports various scenarios, including sentiment analysis, price prediction, product recommendation, sales forecasting and image classification. This article will use a price prediction model as an example.
To use ML.NET, the ML.NET Model Builder must be installed as an individual component or as part of the .NET desktop development workload (optional).
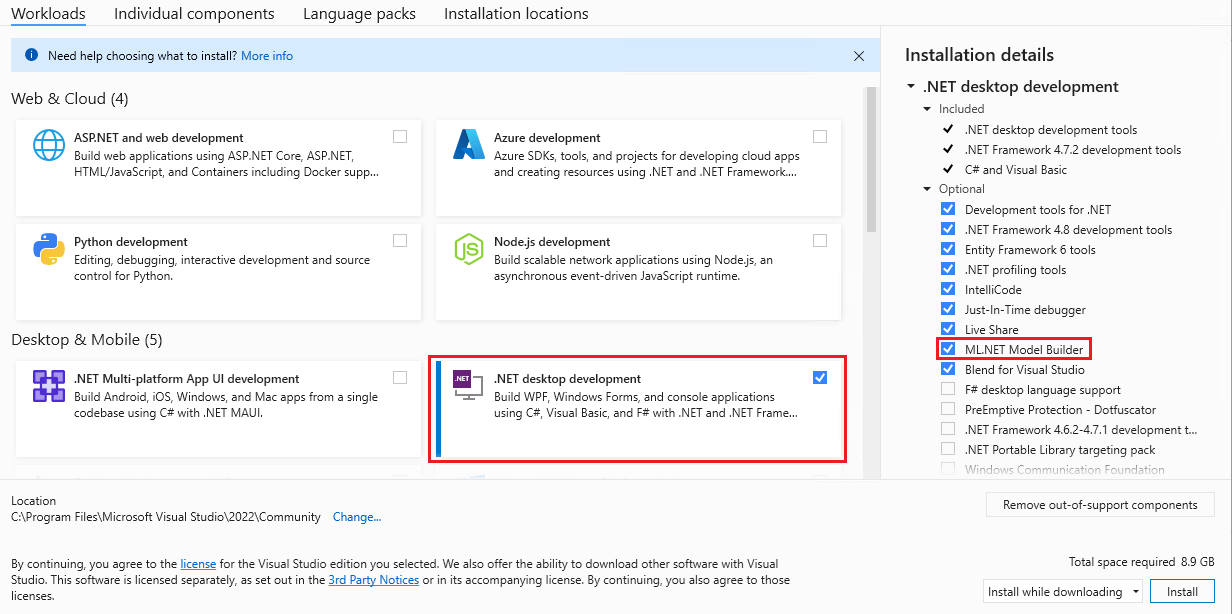
Model Builder
Model Builder is an extension for Visual Studio that provides a step-by-step user interface for building models. Even with little expertise you can use Model Builder to connect to your data stored on disk or SQL Server. Through the interface you’ll be able to train the model and generate code for model re-training and consumption.
You can add Model Builder to Visual Studio through the Extension Manager or by downloading it from the Visual Studio Marketplace.
Getting Started
Training models with ML.NET can be done in nearly any .NET project type. For this example, you’ll use Blazor for its versatility and rich UI system. You will rely on Blazor’s Server Interactive Mode so the application can easily access files and display the UI from single code base.
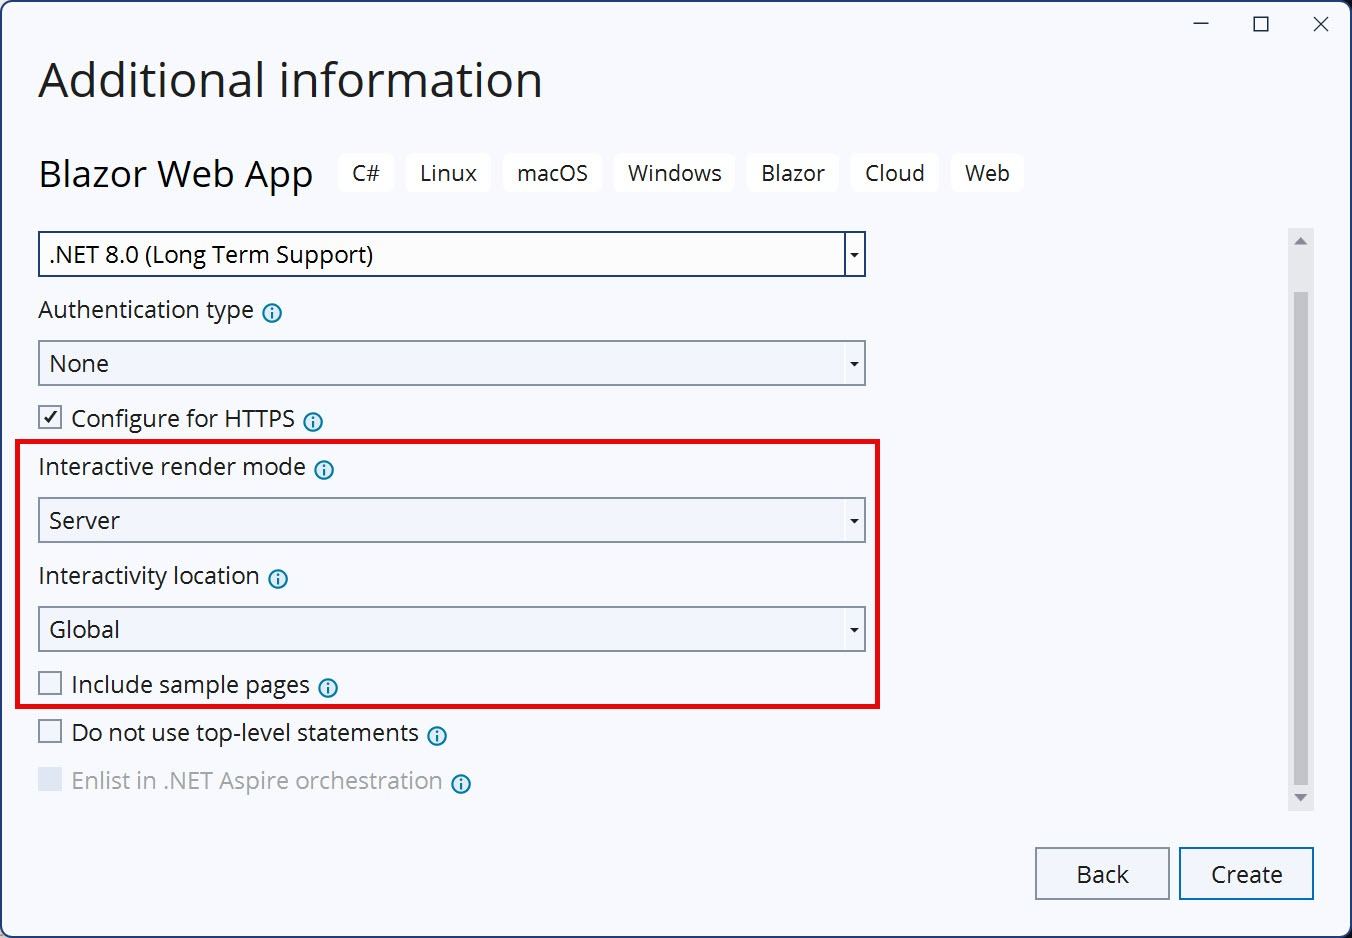
Let’s start by creating a new Blazor project and configure it to use Server Interactive Mode. To generate this project, you’ll use the File > New Project dialog in Visual Studio, then select the Server interactive render mode, and Global interactivity location option. For a clean and simple solution, the Include sample pages option has been disabled.
The generated application contains the Home component (Home.razor) which displays a “Hello World” message. You will use the Home component to display information about the ML.NET Model after training is completed.
Next, run the application and make sure it is working properly. Running the application should open the browser automatically and display the “Hello World” message.

With the Blazor application created, you can begin adding files for training a machine learning model. If you’re learning about ML.NET and would like to explore sample data sets, a repository of ML samples can be found in the Azure AI Gallery . For the purposes of this article, you’ll be using a Taxi Rate data set to train a model which can predict a taxi fare.
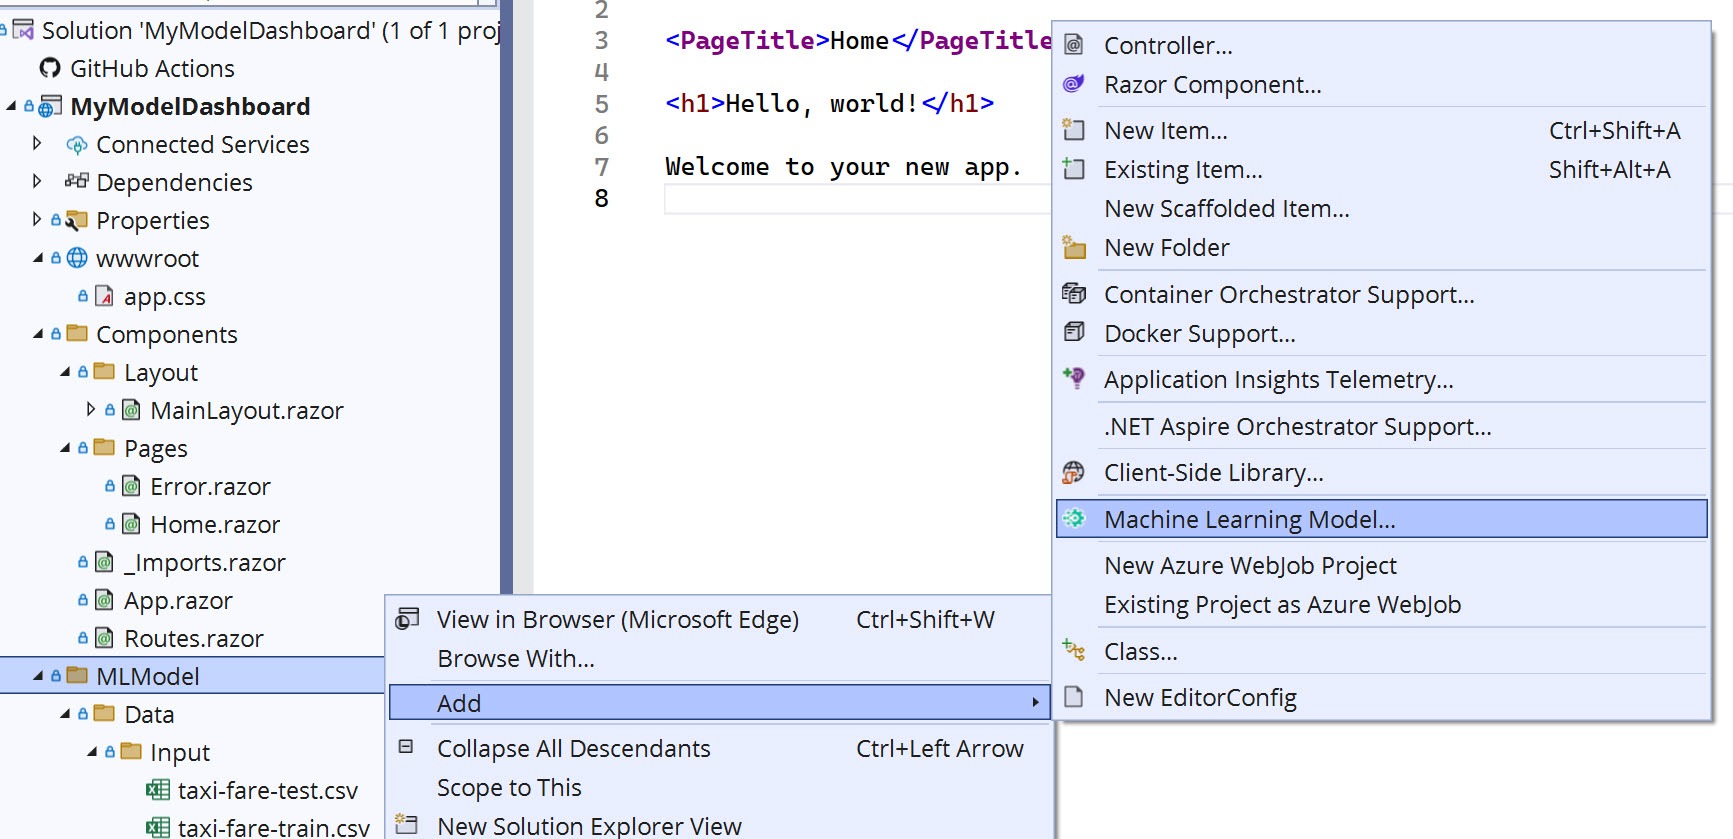
You’ll create a directory in the root of the solution. This directory will contain the inputs, outputs and code associated with the model. The directory should have three folders: /MLModel/Data/Input.
Next, you’ll copy the training and test data to the /Input folder. The directory should have the following structure.
--MLModel
  --Data
    --Input
     -taxi-fare-test.csv
     -taxi-fare-train.csv
With the Blazor application created and data in place, you can begin training the ML model.
Training Your First Model with ML.NET
Starting a new model training is generally a lengthy process that includes selecting multiple training algorithms, identifying labels and parameters, and analyzing several trained models to determine the best fit. This process can be shortened by using the ML.NET Model Builder plugin for Visual Studio. In addition to bootstrapping the model training process, the tool will generate code that is used to retrain and evaluate the model.
Use the ML.NET Model Builder to train a model and generate code using your training and test data. The Model Builder is activated by right-clicking on the desired output folder in the project—in this example, the folder is /MLModel. Then, from the context menu you’ll choose “Add > Machine Learning Model” to initialize the step-by-step wizard.
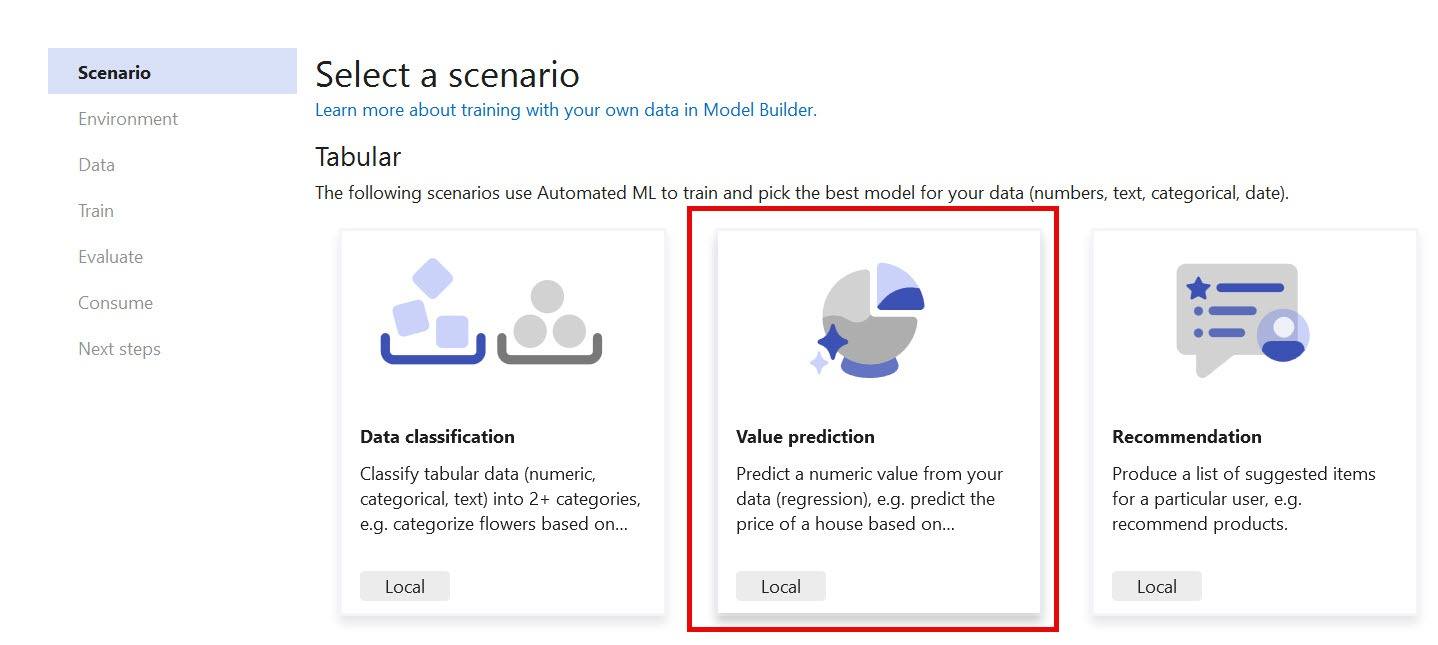
The Model Builder’s first step will guide you through choosing the scenario that represents the problem you’re solving. In this case, you would like to predict a taxi fare based on a collection of completed taxi trips, the associated data and the fare charged. The Value prediction best describes the scenario.
The next step provides choices for the training environment depending on the chosen scenario. Some scenarios, such as computer vision, require intensive computing power provided by Azure to complete the process, while others are performed on local CPU hardware. The value prediction scenario utilizes local CPU hardware for training and only that option is available.
After choosing the environment, you’ll need to provide a path to the training data. The input data can be provided from SQL Server or file source. Once the data source is chosen, a label is identified as the column the model will predict.
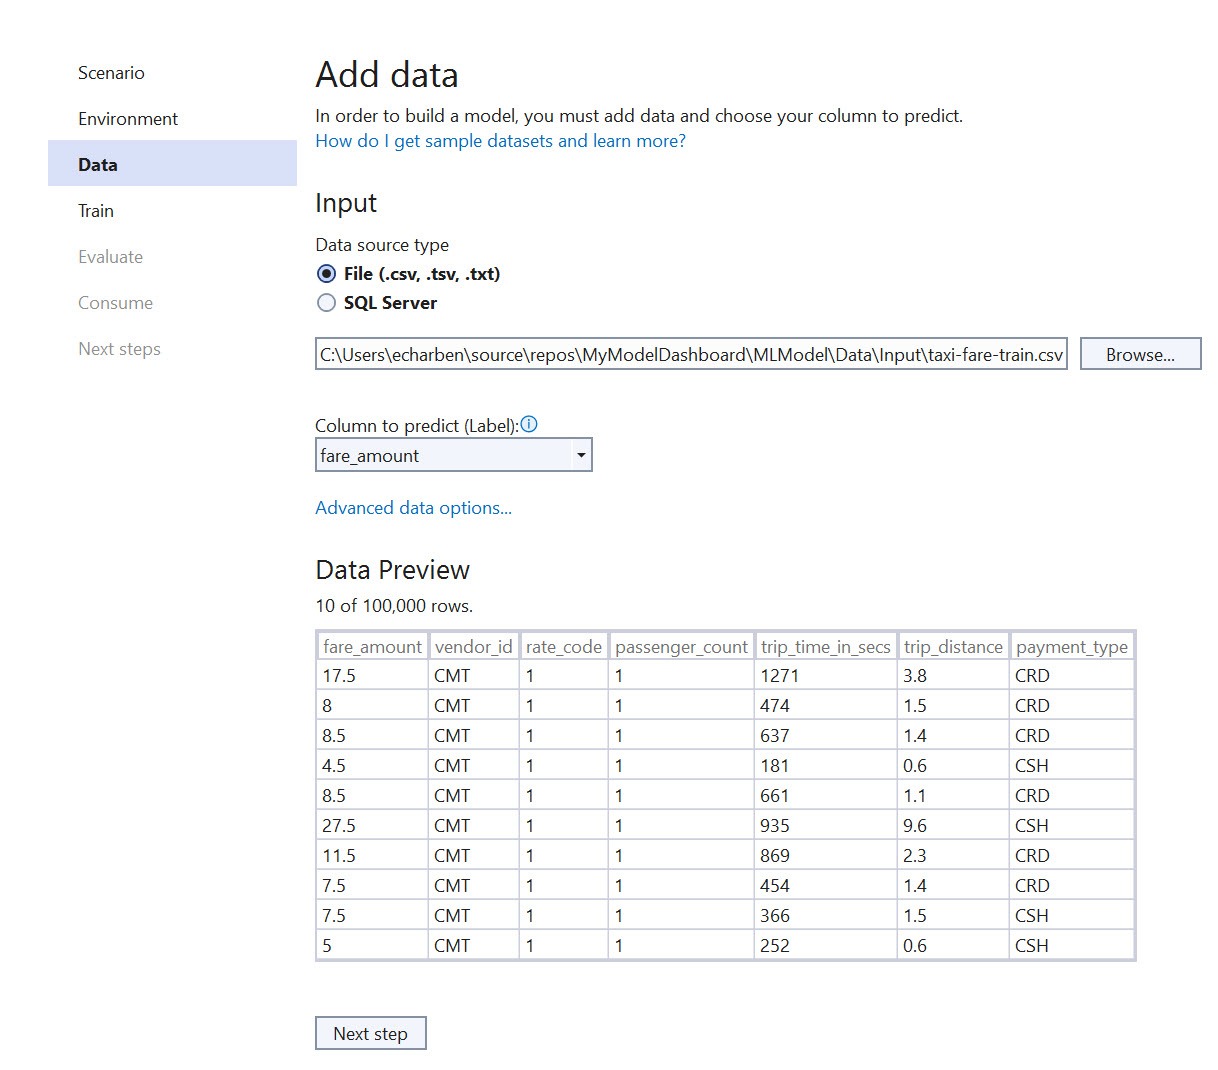
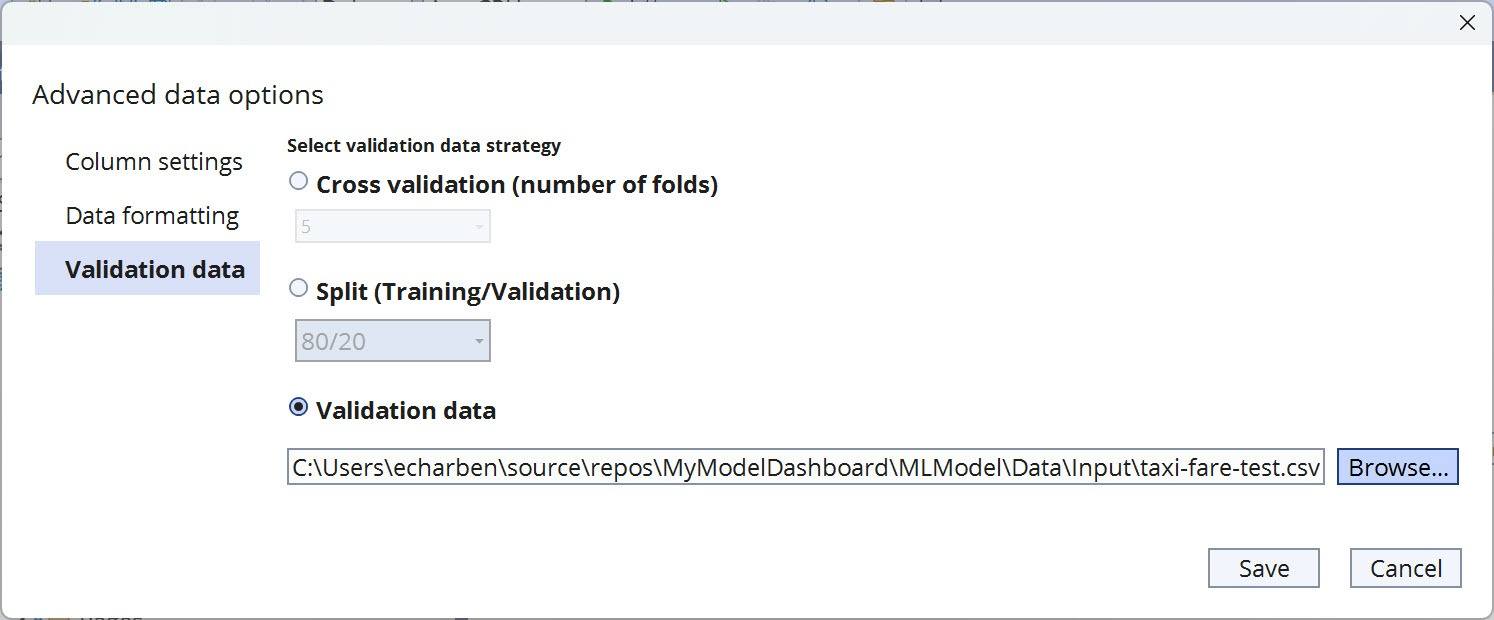
In addition, the advanced options menu is used to modify column settings, schema information and configure test data. Since the data set included a separate file, you will add the file using the validation data option in the advanced settings dialog.
With the settings configured and data files identified, it’s time to train your model. Model Builder uses AutoML to explore multiple models and find the best performing model. Through timed training, AutoML will explore more models with a wider range of settings as time permits. You can find the recommend settings for your model in the Model Builder documentation.
Set the time to 10 seconds then click the “Start training” button. AutoML will begin training and testing models to find the best fit. The output for this process is displayed in the command window of Visual Studio, a sample of this output has been provided below.
> Training time in second: 10
> Use file validation. validation file: C:\~\taxi-fare-test.csv
> |      Trainer                             RSquared   Duration       |
> |--------------------------------------------------------------------|
> |0     FastForestRegression                0.7152     0.5890         |
> ... removed for brevity
> |23    LightGbmRegression                  0.7248     4.5090         |
> |--------------------------------------------------------------------|
> |                          Experiment Results                        |
> |--------------------------------------------------------------------|
> |                               Summary                              |
> |--------------------------------------------------------------------|
> |ML Task: regression                                                 |
> |Label : fare_amount                                                 |
> |Total experiment time :    59.0000 Secs                             |
> |Total number of models explored: 25                                 |
> |--------------------------------------------------------------------|
> |                        Top 5 models explored                       |
> |--------------------------------------------------------------------|
> |      Trainer                             RSquared   Duration       |
> |--------------------------------------------------------------------|
> |23    LightGbmRegression                  0.7248     4.5090         |
> |19    FastForestRegression                0.7210     0.6120         |
> |14    FastForestRegression                0.7208     0.3380         |
> |20    FastForestRegression                0.7202     1.0320         |
> |12    FastForestRegression                0.7202     0.2510         |
> |--------------------------------------------------------------------|
> Set up code snippet: //Load sample data...
> //Load model and predict output...
>
> Generate code behind files
>
>
> Copying generated code to project...
> Copying TaxiModel.consumption.cs to folder:
> Copying TaxiModel.training.cs to folder:
> Copying TaxiModel.evaluate.cs to folder:
> COMPLETED
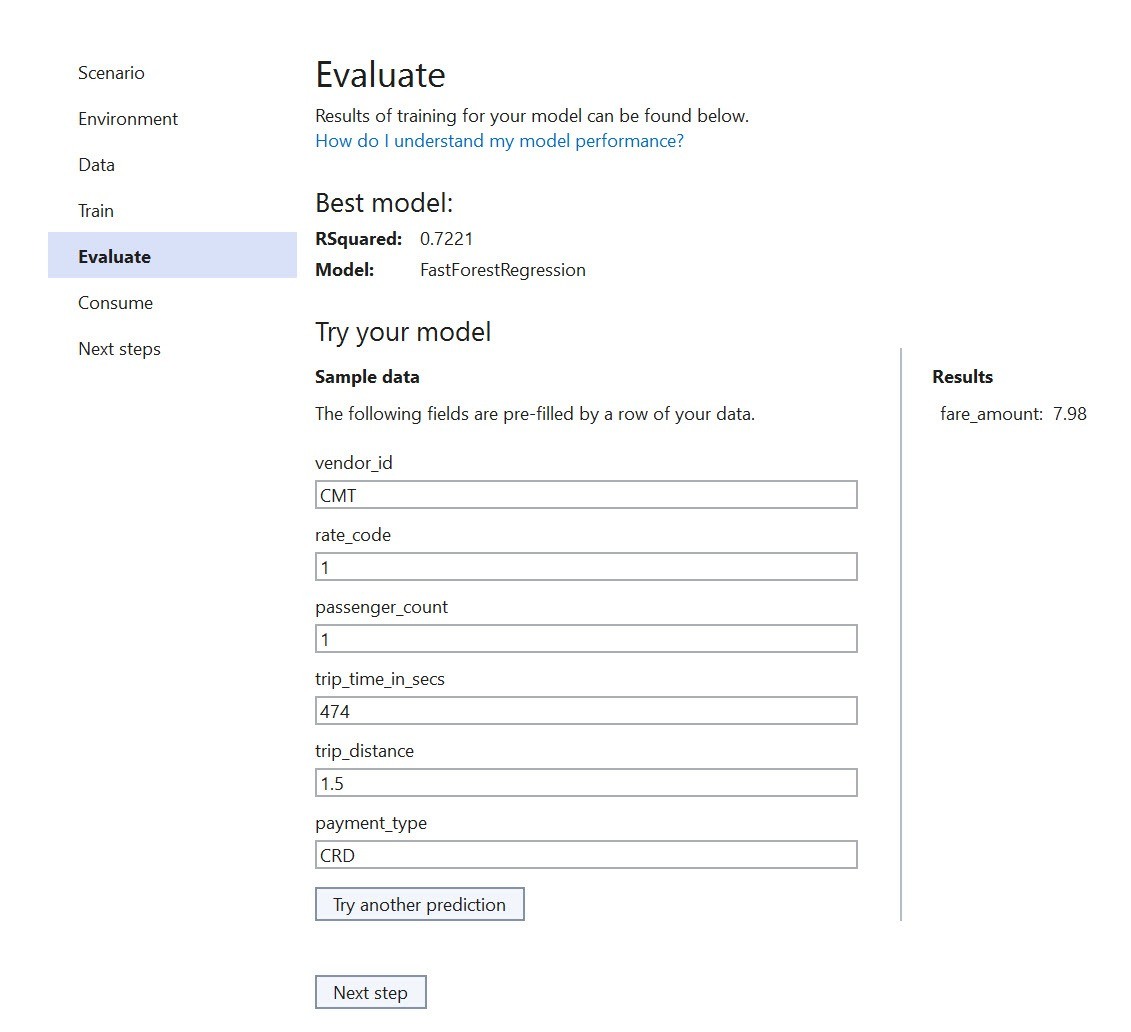
In the Evaluation step, you will have the first chance to test your model in real time. A form is provided by Model Builder and populated with data from the training data set. You will recreate this interface using a Blazor spreadsheet component later in this article.
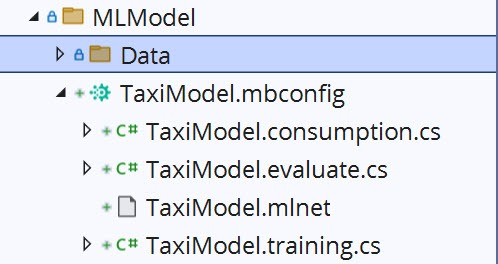
At this point the model and code have been generated for the project. The Consume step contains additional code generation options as well as a sample snippet to bootstrap your application.
Using the Model from Blazor
The Model Builder generates a group of partial classes (ModelName.*.cs) that are responsible for training, evaluating and consuming the model (ModelName.mlnet) at runtime. With these classes and the code sample provided from the Consume step of the Model Builder, you can quickly create a working prediction example in Blazor.
The first step is making a hard-coded prediction using the sample code provided. In the Home component (Home.razor), add a code block then a function named Predict. Inside the Predict function, you’ll paste the sample snippet.
void Predict()
{
    //Load sample data
    var sampleData = new TaxiModel.ModelInput()
        {
            Vendor_id = @"CMT",
            Rate_code = 1F,
            Passenger_count = 1F,
            Trip_time_in_secs = 474F,
            Trip_distance = 1.5F,
            Payment_type = @"CRD",
        };

    //Load model and predict output
    var result = TaxiModel.Predict(sampleData);
}
Next, create a field to make the prediction output available to the user interface (UI). The Predict method is updated so the predicted value is assigned to the Prediction field.
//Load model and predict output
//var result = TaxiModel.Predict(sampleData);
Prediction = TaxiModel.Predict(sampleData);
In the component’s markup, the predicted score is displayed by writing the Score property to the UI.
Fare Amount is @Prediction?.Score.ToString("C")
The final step is to invoke the Predict function from a button click event.
<button @onclick=Predict>Predict</button>
The completed code shown below will exercise the model by calling the Predict method.
@page "/"

<h1>Predict</h1>

<button @onclick=Predict>Predict</button>

Fare Amount is @Prediction?.Score.ToString("C")


@code {
    TaxiModel.ModelOutput? Prediction;

    void Predict()
    {
        //Load sample data
        var sampleData = new TaxiModel.ModelInput()
            {
                Vendor_id = @"CMT",
                Rate_code = 1F,
                Passenger_count = 1F,
                Trip_time_in_secs = 474F,
                Trip_distance = 1.5F,
                Payment_type = @"CRD",
            };

        //Load model and predict output
        Prediction = TaxiModel.Predict(sampleData);

    }
}
Running the application will show a Predict button. Clicking the button will display results of the prediction formatted as currency.

Retraining and Evaluating ML.NET from Blazor
Next, you’ll build a page to execute model training from Blazor. This will allow you to regenerate the model (TaxiModel.mlnet) directly from a Blazor view. In addition, you’ll use the model to produce and display statistics used to determine the model’s accuracy and key features.
To begin, you’ll create a new Blazor component in the application’s Components folder named Train.razor. In Train.razor, a page directive is added so it can be navigated to in the browser with the URL /train. A message field is added to the component which is used to display the state of the process with the user.
@page "/train"
<h3>Train</h3>

@message

@code {
    string message = "Ready to train, click train model to continue";
}
Next, you’ll need to create a method TrainModel that is used to initialize training and update the message when the task is complete. In TrainModel, the TaxiModel.Train method is called with the desired model output path. Because training can be a long running task, the method is wrapped in a Task to prevent it from locking the UI thread. After the Task completes the message is updated to indicate training has finished.
string modelPath = Path.GetFullPath("MLModel//TaxiModel.mlnet");

async Task TrainModel()
{
    await Task.Run() =>
    {
        TaxiModel.Train(modelPath);
    });
    message = "Training complete.";
}
A button is added to the UI and triggers the TrainModel method using the onclick event. In addition, a field flag is used to disable the button to indicate the training process is running.
<button @onclick=TrainModel disabled="@(isLoading)">Train Model</button>

@code {
    ...
    bool isLoading;

    async Task TrainModel()
    {
        isLoading = true;
        await Task.Run() =>...
        isLoading = false;

    }
}
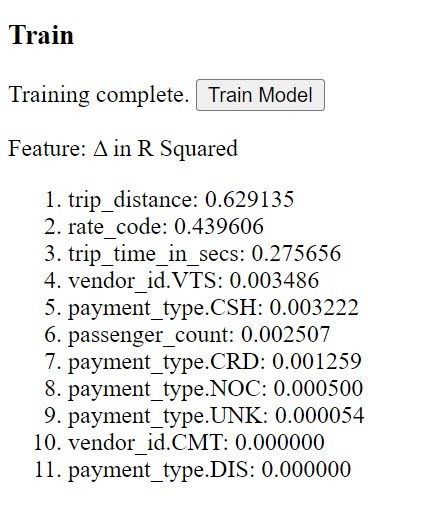
At this point, clicking the Train Model button will successfully execute training and produce a new trained model. The next step is to improve the output shown on the page to include permutation feature importance metrics (PFI).
Permutation feature importance (PFI) is a technique to determine the importance of features in a trained machine learning model. PFI works by taking a labeled dataset, choosing a feature and permuting the values for that feature across all the examples, so that each example now has a random value for the feature and the original values for all other features.
The evaluation metric (e.g., R-squared) is then calculated for this modified dataset, and the change in the evaluation metric from the original dataset is computed. The larger the change in the evaluation metric, the more important the feature is to the model.
When the TaxiModel class was generated by the Model Builder plugin, a CalculatePFI method was created in the TaxiModel.evaluate partial class. The CalculatePFI makes use of ML.NET’s built-in PermutationFeatureImportance function. Using CalculatePFI, you will display a list of features and values from the model and indicate what feature has the greatest effect on the prediction.
First, you’ll add the field PFIResults to store the results of CalculatePFI. Next, a GetPFI method is created to set up a new MLContext with training data and a trained model. GetPFI also calculates the feature importance, and stores the results in PFIResults.
void GetPFI()
{
    var mlContext = new MLContext();
    var dataView = TaxiModel.LoadIDataViewFromFile(mlContext, testDataPath, ',', true, false);
    ITransformer mlModel = mlContext.Model.Load(modelPath, out var _);
    PFIResults = TaxiModel.CalculatePFI(mlContext, dataView, mlModel, @"fare_amount");
}
The GetPFI method is invoked in TrainModel after Train is called within the Task after model training is complete.
async Task TrainModel()
{
...
    await Task.Run(() =>
    {
        TaxiModel.Train(modelPath);
        GetPFI():
    });
...
}
The PFIResults are displayed by adding a foreach loop to the markup. When the PFIResults are available, each feature and value are displayed in an ordered list using Razor markup.
@if (PFIResults is not null)
{
<p>Feature: Δ in R Squared</p>
<ol>
@foreach (var (feature, value) in PFIResults)
{
<li>@feature: @value.ToString("F6")</li>
}
</ol>
}
When you open the training page and click the Train Model button, the PFI stats are shown when the model training completes. In this example you can see the trip_distance, rate_code, and trip_time features have the greatest influence on the model.
This example demonstrates how to integrate ML.NET with Blazor to build an interactive machine learning application. With the base features complete, you can add additional views to improve the user experience (UX).
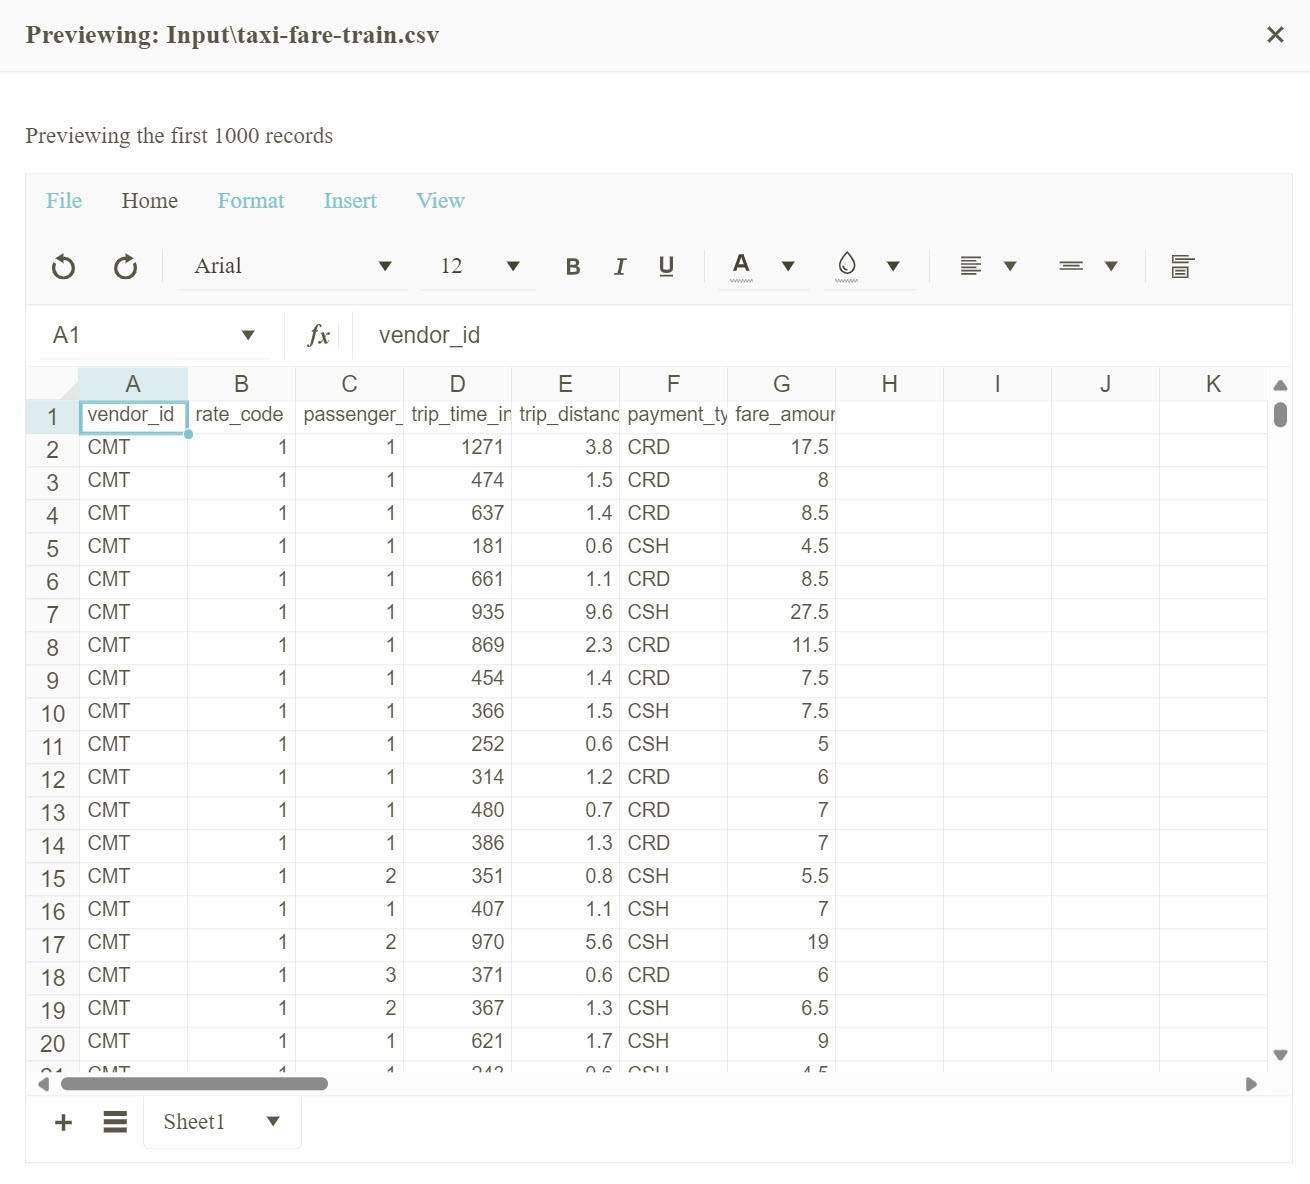
Adding a Data Preview with Spreadsheets
In this example, a view similar to the one seen in the Data step of the Model Builder tool is created. The data preview will use a spreadsheet UX to display a preview of data from the model training .csv file using Blazor. To display a complex view like a spreadsheet, you’ll need third-party components. For this, we will use Progress Telerik UI for Blazor. If you do not have a license to Telerik UI for Blazor, a free trial is available from the Telerik website.
The first step in using the Telerik spreadsheet component is to install the Telerik dependencies by following the getting started instructions in the documentation.
After setting up the Telerik dependencies, you’ll add a new component named Preview. In the Preview component, you’ll add a page route using @page "/preview". Next, you’ll add a TelerikSpreadsheet component with an empty Data property. The Data property requires a byte array of spreadsheet data in XLS format. The nullable array xls? is used to conditionally render the component when data is loaded.
@if (xls is not null)
{
    <TelerikSpreadsheet Data="xls" />
}

@code {
    byte[]? xls;
}
Next, you’ll need to load the data from the .csv file and convert it to an Excel format the spreadsheet component can display. You’ll start by stubbing out two functions in the OnInitializedAsync lifecycle method. The first method, GetWorkBook, will read the data from a .csv file into a Workbook object. The second, ConvertWorkbookToXls will take the Workbook object and convert it into an Excel formatted document stored as a byte array.
byte[]? xls;

protected override async Task OnInitializedAsync()
{
    Workbook previewWorkbook = await GetWorkbook();
    xls = ConvertWorkbookToXls(previewWorkbook);
}
Next you’ll create the GetWorkbook method. In this method, you will read the first 1,000 lines of the .csv training file using File.ReadLines. Next, you will convert the CSV data into a byte array. Then, you will format the byte array as a Workbook object by calling the CsvFormatProvider’s Import function. The CsvFormatProvider is part of the Telerik Document Processing Library (DPL) included with the Telerik UI for Blazor.
Task<Workbook> GetWorkbook() => Task.Run(() => { var dataString = System.IO.File.ReadLines(Path.GetFullPath("MLModelData//Input//taxi-fare-train.csv"))
.Take(1000);
        byte[] data = Encoding.UTF8.GetBytes(string.Join(Environment.NewLine, dataString));
        return new CsvFormatProvider().Import(new MemoryStream(data));
    });
Now you’ll add the ConvertToXls method to convert the Workbook object to an Excel spreadsheet format using the Telerik DPL. In this method, an XlsxFormatProvider is used to Export the Workbook in the xlsx format. The exported Excel data then can be returned as a byte array.
byte[]? ConvertXls(Workbook wb)
{
    byte[]? xlsOut;
    using (MemoryStream xlsxStream = new MemoryStream())
    {
        new XlsxFormatProvider().Export(wb, xlsxStream);
        xlsOut = xlsxStream.ToArray();
    };
    return xlsOut;
}
With the code complete you can run the application and navigate to the preview page. The preview page will show the first 1,000 records of the Excel training data.
Conclusion
This post provided a foundational understanding of integrating ML.NET with Blazor to create interactive web applications with machine learning capabilities. We covered these how-to steps:
- Set up the development environment: Install the necessary tools, including .NET, Blazor and ML.NET Model Builder.
- Train a Model with ML.NET Model Builder: Leverage the Model Builder to simplify the training process and generate code for retraining and evaluation.
- Consume the model in Blazor: Use the generated code to make predictions within Blazor components.
- Retrain and evaluate the model from Blazor: Build Blazor views to retrain the model and display key model evaluation metrics like permutation feature importance (PFI).
- Enhance the user experience with spreadsheets (optional): Integrate third-party components like Telerik UI for Blazor to provide spreadsheet previews of data used for training.
By combining Blazor’s interactive nature with ML.NET’s machine learning capabilities, you can create powerful web applications with advanced features like data analysis and prediction.
In the next article in this series, the code, training, analysis and UI will all be improved by incorporating Telerik UI for Blazor and Page Templates and Building Blocks. Throughout the process, you’ll create a working ML training dashboard application.
Want to explore Telerik UI for Blazor yourself?

Ed Charbeneau
Ed
Related Posts
Comments
All articles
Topics
Web MobileMobile
Desktop
Design
Productivity
People
