
Blazor Basics: Progressive Web Apps (PWAs) with Blazor WebAssembly

Summarize with AI:
Learn what Progressive Web Apps (PWAs) are and how to add PWA support to a Blazor WebAssembly application.
Progressive web applications (PWA) are an alternative to native applications, with the main advantage of not requiring separate bundling or distribution for different platforms. Instead, they’re an extension of web applications providing offline capabilities and advanced caching, improving the startup performance of a web application.
PWAs are supported by the major browsers, including Google Chrome, Firefox for Android, Microsoft Edge and Apple Safari, but not by Firefox for Desktop.
In this article, you will learn the fundamentals of progressive web applications and how to create a PWA using Blazor WebAssembly.
You can access the code used in this example on GitHub.
How Do Progressive Web Apps Work?
Progressive web apps use web platform technologies to provide a user experience beyond a regular web application.
PWAs can be installed on the client machine, execute code in the background (offline support), and integrate with the device or other PWAs. For example, PWAs can handle push messages from the server or display notifications using the operating system notifications system.
A web app manifest file defines the required metadata for a PWA. It defines the application’s name (relevant for installing the app) and an icon.
Service workers are optional components that allow the PWA to process information in the background and provide offline support.
For example, a service worker could send the data to the server when the device is online after being disconnected.
Key Features of a PWA
Let’s focus on the key features a PWA provides:
- Offline support: Uses service workers to cache essential assets, allowing the app to work without a (stable) internet connection.
- Installability: Users can “install” the app directly from the browser on their device.
- Push notifications: PWAs can send notifications to users even when the browser is closed.
- Performance: Cached resources reduce load times and enhance performance.
You can pick and choose. A PWA doesn’t have to implement all of those key features.
Who Uses PWAs in 2024/2025?
Big companies such as Uber, Pinterest, Housing.com and Forbes provide PWA applications.
Let’s look at the Uber PWA. You might think that Uber has an app in the Google Play Store and the Apple App Store, so why do they need a PWA?
Uber’s goal is to connect riders and drivers all over the world. Globally, only some people use one of the latest, officially supported smartphones. Google and Apple make their own rules on what devices get access to what applications. For example, they require application developers to target specific platform versions, which eventually excludes older devices from using their apps.
Leveraging PWA, Uber is able to provide a better user experience using a PWA compared to a traditional web application for those users excluded from using mobile apps.
Creating a Blazor WebAssembly Application as a PWA
Now that we know what a PWA is, what benefits it has and why you might want to implement a PWA, let’s focus on creating a PWA using Blazor WebAssembly.
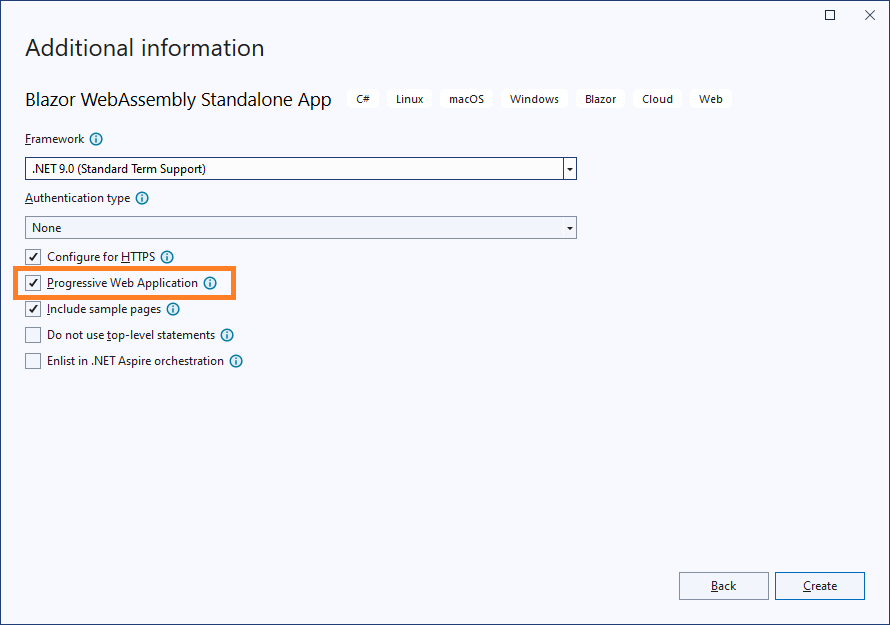
The Blazor WebAssembly Standalone App project template provides the option to select the Progressive Web Application checkbox when creating the project.
When using the .NET CLI, the blazorwasm project template offers the --pwa option to add the same functionality to your Blazor Web Assembly application.
dotnet new blazorwasm -o BlazorPWA --pwa
The project template creates a Blazor WebAssembly application (without a hosting ASP.NET Core project), with the following PWA-specific files inside the wwwroot folder:
- icon-192.png
- icon-512.png
- manifest.webmanifest
- service-worker.js
- service-worker.published.js

The service-worker.js file, the mainfest file, and the icons are referenced in the index.html file:
<!DOCTYPE html>
<html lang="en">

<head>
  <!-- omitted -->
  <link href="manifest.webmanifest" rel="manifest" />
  <link rel="apple-touch-icon" sizes="512x512" href="icon-512.png" />
  <link rel="apple-touch-icon" sizes="192x192" href="icon-192.png" />
</head>
<body>
  <!-- omitted -->
  <script src="_framework/blazor.webassembly.js"></script>
  <script>navigator.serviceWorker.register('service-worker.js');</script>
</body>
The generated manifest file (manifest.webmanifest) contains the configuration of the PWA. It references the icon files and specifies the application name.
{
  "name": "BlazorPWA",
  "short_name": "BlazorPWA",
  "id": "./",
  "start_url": "./",
  "display": "standalone",
  "background_color": "#ffffff",
  "theme_color": "#03173d",
  "prefer_related_applications": false,
  "icons": [
    {
      "src": "icon-512.png",
      "type": "image/png",
      "sizes": "512x512"
    },
    {
      "src": "icon-192.png",
      "type": "image/png",
      "sizes": "192x192"
    }
  ]
}
You can learn more about the available settings in the PWA manifest specification.
The service-worker.js file used during the development of the application is empty by default. The service-worker.published.js file contains the code for the production environment.
It handles the install, activate, and fetch events by registering a callback function.
self.addEventListener('install', event => event.waitUntil(onInstall(event)));
self.addEventListener('activate', event => event.waitUntil(onActivate(event)));
self.addEventListener('fetch', event => event.respondWith(onFetch(event)));
I will explain the main functionality of the implementation. For a full reference, look at the project’s GitHub repository or generate a Blazor WebAssembly PWA application yourself.
async function onInstall(event) {
    console.info('Service worker: Install');

    // Fetch and cache all matching items from the assets manifest
    const assetsRequests = self.assetsManifest.assets
        .filter(asset => offlineAssetsInclude
            .some(pattern => pattern.test(asset.url)))
        .filter(asset => !offlineAssetsExclude
            .some(pattern => pattern.test(asset.url)))
        .map(asset => new Request(asset.url,
            { integrity: asset.hash, cache: 'no-cache' }));

    await caches.open(cacheName)
        .then(cache => cache.addAll(assetsRequests));
}
The callback function for the install event caches the assets found in the manifest definition.
async function onActivate(event) {
    console.info('Service worker: Activate');

    // Delete unused caches
    const cacheKeys = await caches.keys();
    await Promise.all(cacheKeys
        .filter(key => key.startsWith(cacheNamePrefix) && key !== cacheName)
        .map(key => caches.delete(key)));
}
The callback function for the activate event deletes unused caches by getting the keys from the cache and comparing them to the current version of the application.
async function onFetch(event) {
    let cachedResponse = null;
    if (event.request.method === 'GET') {
        // For all navigation requests, try to serve index.html from cache,
        // unless that request is for an offline resource.
        // If you need some URLs to be server-rendered,
        // edit the following check to exclude those URLs
        const shouldServeIndexHtml = event.request.mode === 'navigate'
            && !manifestUrlList.some(url => url === event.request.url);

        const request = shouldServeIndexHtml ? 'index.html' : event.request;
        const cache = await caches.open(cacheName);
        cachedResponse = await cache.match(request);
    }

    return cachedResponse || fetch(event.request);
}
The callback for the fetch event acts as an interceptor. This callback function is called for each fetch request executed in the application code.
The implementation looks for the requested resource in the cache. If it cannot find it in the cache, it forwards the request to the regular fetch function, which performs an HTTP request.
This standard implementation of the service worker is often enough for simple PWAs. However, you can customize the code if necessary.
For example, the standard implementation does not cache the information retrieved by executing the HTTP request via the fetch function. You could add that to cache the response and provide it from the cache for future calls.
However, that only makes sense in cases where you do not rely on up-to-date information from a server. Otherwise, this implementation would always return the same information, although the server has a newer data version.
Loading Data in a PWA
In the generated Weather component, we see the following code:
protected override async Task OnInitializedAsync()
{
    forecasts = await Http.GetFromJsonAsync<WeatherForecast[]>(
        "sample-data/weather.json");
}
The sample-data/weather.json path references a file provided with the PWA. In the wwwroot folder, we have a sample-data folder containing a weather.json file with the following data:
[
  {
    "date": "2022-01-06",
    "temperatureC": 1,
    "summary": "Freezing"
  },
  {
    "date": "2022-01-07",
    "temperatureC": 14,
    "summary": "Bracing"
  },
  {
    "date": "2022-01-08",
    "temperatureC": -13,
    "summary": "Freezing"
  },
  {
    "date": "2022-01-09",
    "temperatureC": -16,
    "summary": "Balmy"
  },
  {
    "date": "2022-01-10",
    "temperatureC": -2,
    "summary": "Chilly"
  }
]
In a production application, you could rely on default data loaded from the wwwroot folder in an offline scenario, or cache the data retrieved when the application was last online. It all depends on the use case.
Adding PWA Support to Existing Blazor WebAssembly Applications
It’s also possible to add PWA support to an existing Blazor WebAssembly application.
First, we need to add the ServiceWorkerAssetsManifest property and a ServiceWorker item to the project file:
<PropertyGroup>
  <ServiceWorkerAssetsManifest>
    service-worker-assets.js
  </ServiceWorkerAssetsManifest>
</PropertyGroup>

<ItemGroup>
  <ServiceWorker Include="wwwroot\service-worker.js"
    PublishedContent="wwwroot\service-worker.published.js" />
</ItemGroup>
Next, you need to create and add the files required for a PWA to the application. It’s best to create a new Blazor WebAssembly application with PWA support (see above) and copy the generated assets from the new project to the existing application.
You should copy the following files into the wwwroot folder of the existing Blazor WebAssembly application:
- icon-192.png
- icon-512.png
- manifest.webmanifest
- service-worker.js
- service-worker.published.js
You also need to reference the icons and the PWA manifest within the root HTML document of the application, most likely the index.html file:
<link href="manifest.webmanifest" rel="manifest" />
<link rel="apple-touch-icon" sizes="512x512" href="icon-512.png" />
<link rel="apple-touch-icon" sizes="192x192" href="icon-192.png" />
To reference the script of the service worker, you also need to add the following code after the blazor.webassembly.js script reference:
<script>navigator.serviceWorker.register('service-worker.js');</script>
Installing a PWA in a Browser
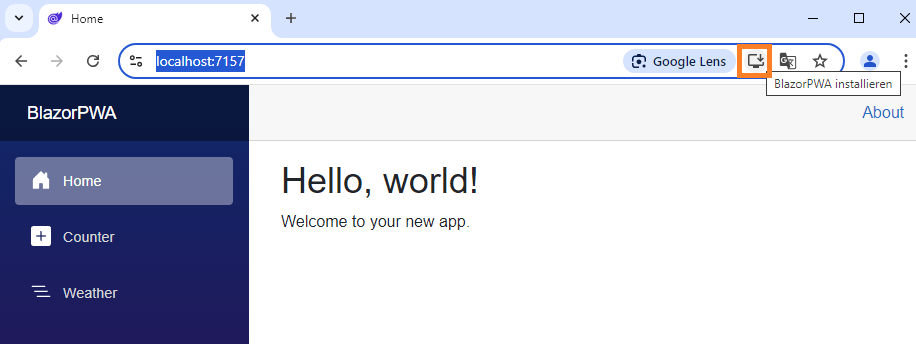
Every web application providing a PWA manifest will be installable in the browser. For example, the demo application used in this article can be installed on Google Chrome using the button in the address bar.
Installing a PWA app on Windows using Google Chrome results in a desktop shortcut and, optionally, an icon in the taskbar.
When launching the application, we use the desktop shortcut (without providing a URL to the browser’s address bar). The launched application doesn’t show the address bar.
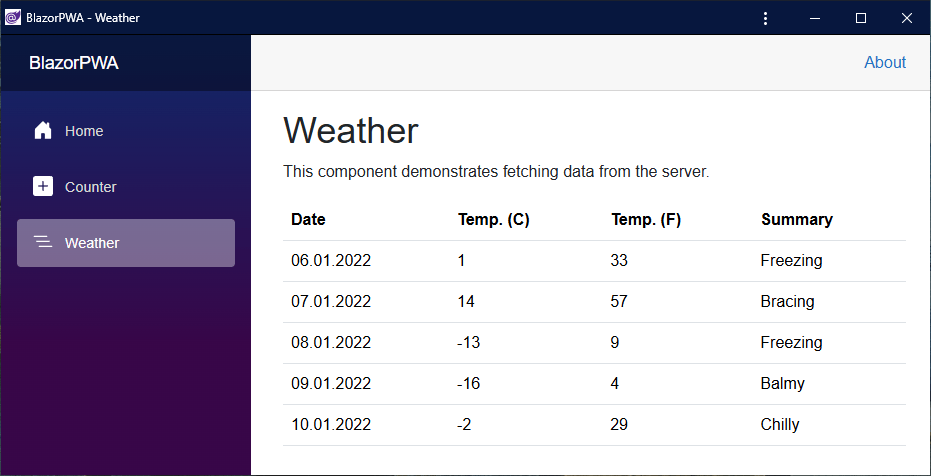
It feels much more like a native application, even though it is still a web application.
Push Notifications
Sending push notifications from a server to the native notification system depends on backend technology, such as whether you are using an ASP.NET Core backend.
The mechanism on the client side for receiving and displaying push notifications is independent of Blazor WebAssembly and is implemented by the service worker.
Implementing push notifications is out of the scope of this article. However, Microsoft has a great example, providing an example implementation for push notifications in their Blazing Pizza application.
Missing PWA Support in Firefox for Desktop
While the official Firefox browser currently does not support PWA, there is a community project that allows the installation, management and use of PWAs in Firefox for Desktop.
If you are targeting users with restrictions on using Firefox as the only option or want to help users wanting to use Firefox, this tool might be a welcomed solution.
Disclaimer: Install and use unofficial browser extensions at your own risk.
Conclusion
Progressive Web Apps (PWAs) provide helpful features that improve the user experience, such as offline support, integration into the native notification system and the ability to run the app from the start screen of a smartphone without entering the URL into the address bar of a browser.
PWAs are widely supported, and developers can pick and choose the PWA features they want to implement for their web applications.
Microsoft provides starter templates for creating Blazor WebAssembly applications with PWA support in Visual Studio and the .NET CLI.
At the time of writing this article, the only major browser that does not support PWAs is Firefox for Desktop.
You can access the code used in this example on GitHub.
If you want to learn more about Blazor development, you can watch my free Blazor Crash Course on YouTube. And stay tuned to the Telerik blog for more Blazor Basics.

Claudio Bernasconi
Claudio Bernasconi is a passionate software engineer and content creator writing articles and running a .NET developer YouTube channel. He has more than 10 years of experience as a .NET developer and loves sharing his knowledge about Blazor and other .NET topics with the community.
Related Posts
Comments
All articles
Topics
Web MobileMobile
Desktop
Design
Productivity
People
