
Blazor Basics: Handling Errors and Exception Logging in Blazor Applications

Summarize with AI:
Learn the fundamentals of error handling and exception logging in Blazor web applications.
Like in other modern web development frameworks, error handling and exception logging are essential to provide high-quality software products. This article will discuss the options and challenges we face with implementing them with Blazor web app development.
You can access the code used in this example on GitHub.
Error Types in Blazor Applications
Before diving into solutions for handling particular error cases, let’s first explore the different error types a Blazor web application faces:
- Runtime errors: Client-side and server-side errors occur during the execution of the application. For example, JavaScript interop, API failures or database connection problems.
- Validation errors: Form input and validation errors occur when handling user input in a web application or the contact form of a company website.
- Configuration errors: Errors occurring during the startup of the Blazor web applications, such as misconfigured dependencies and middleware.
- Unexpected errors: Programming errors, such as null reference exceptions, unhandled exceptions or other unknown errors.
Each error type requires a different approach to handle them in our applications gracefully.
The General Error-Handling Strategy for Blazor
We have a few options for handling errors in Blazor web applications.
The default C# try-catch mechanism allows us to write defensive code catching expected exceptions when performing operations such as calling a remote service or accessing the file system.
To contain UI errors, we can implement the ErrorBoundary type. For global error handling, we register an error handler in the Program.cs file.
For Blazor WebAssembly applications, we can intercept unhandled client-side exceptions in the Program.cs file.
Similar to other .NET applications, we should follow best practices and wrap critical code inside a try-catch block. For example, IO operations such as reading or writing files or calling HTTP services.
In this article, we will look at the different options for error handling in more detail.
Implementing Error Boundaries
Whenever we face an unhandled exception in a Blazor application, we will see the yellow box on the bottom of the screen.
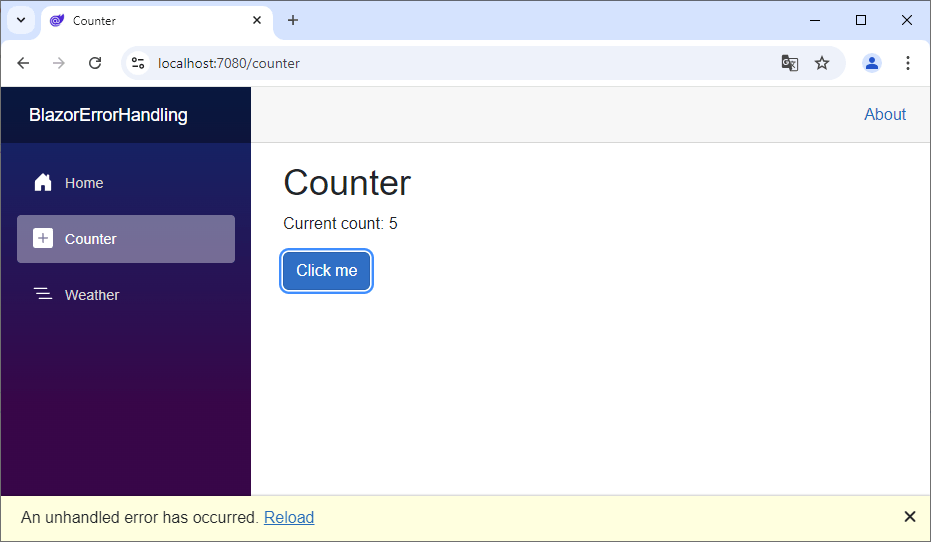
This error box is defined as part of the MainLayout.razor component.
<div id="blazor-error-ui" data-nosnippet>
    An unhandled error has occurred.
    <a href="." class="reload">Reload</a>
    <span class="dismiss">🗙</span>
</div>
For the Blazor Server application, you need to refresh the browser after such an error happens to continue using the web application. Blazor WebAssembly is more forgiving and lets you continue using the app. However, the error remains on the bottom of the screen unless you dismiss it.
You can improve the look and feel of the error. However, what’s better than making it more attractive is avoiding it before it happens. That’s where Error Boundaries come into play. Error Boundaries provide a simple way to catch errors and control how they travel up the component hierarchy.
Let’s add an Error Boundary in the MainLayout.razor component:
<div class="page">
    <div class="sidebar">
        <NavMenu />
    </div>

    <main>
        <!-- code omitted -->
        <article class="content px-4">
            <ErrorBoundary>
                @Body
            </ErrorBoundary>
        </article>
    </main>
</div>
The MainLayout component looks the same as it is generated by the default Blazor web app project template. However, we added an ErrorBoundary component around the @Body placeholder.
We can also add a few lines of CSS to the app.css file to style the look of the rendered error:
.blazor-error-boundary {
    background-color: darkred;
    padding: 1rem 1rem 1rem 3.7rem;
    color: white;
}

.blazor-error-boundary::after {
    content: "An error has occurred."
}
The resulting error looks like this:
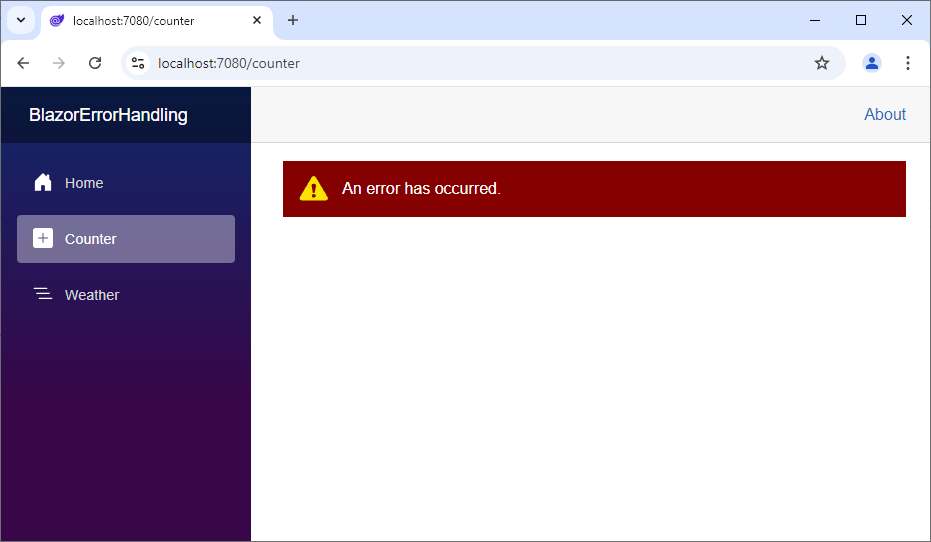
Besides being able to control the look and feel using CSS (which you can also do for the regular error bar on the bottom), you can continue using the application in case an error occurs.
The reason is that the Error Boundary stops the error where it is added to the component tree. In this case, we can visit another page, but the layout will always display our error.
You can experiment with the ErrorBoundary type and add it closer to potential errors in the component tree. This helps in keeping the other parts of the application running when an error occurs in a specific location of the app.
You can also customize the HTML rendered when an error occurs. You can expand on the code example shown above and use the following code:
<ErrorBoundary>
  <ChildContent>
    @Body
  </ChildContent>
  <ErrorContent>
    <div>Customized error display</div>
  </ErrorContent>
</ErrorBoundary>
In this code, the ChildContent render fragment contains the content rendered during normal operation of the application.
If an unhandled exception occurs, the HTML code within the ErrorContent render fragment will be rendered.
The @context property allows you to access the exception in the ErrorContent render fragment. The following code shows the message of the unhandled exception as the error message of the ErrorBoundary component.
<article class="content px-4">
    <ErrorBoundary>
        <ChildContent>
            @Body
        </ChildContent>
        <ErrorContent>
            <div>@context.Message</div>
        </ErrorContent>
    </ErrorBoundary>
</article>
The resulting error looks like this:
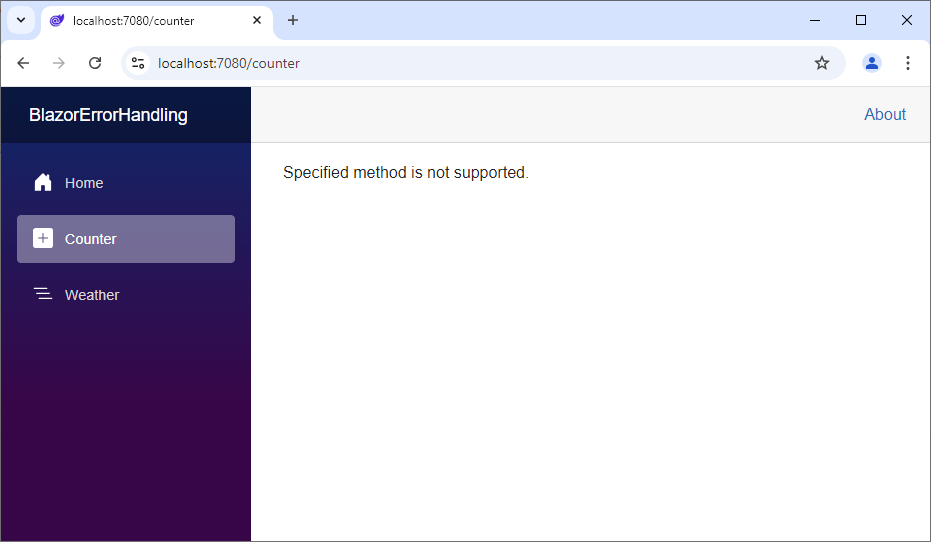
The following code shows how I generate the exception inside the Counter component for this demo application:
private void IncrementCount()
{
    currentCount++;

    if (currentCount > 5)
    {
        throw new NotSupportedException();
    }
}
Recovering from an Unhandled Error
When an unhandled exception occurs, the ErrorContent render fragment is rendered, and the application stays in an operational state. However, the error still shows when we navigate to a different page.
To resolve the error, we can use the Recover method on the ErrorBoundary type in the code section.
@code {
    private ErrorBoundary? _errorBoundary;

    protected override void OnParametersSet()
    {
        _errorBoundary?.Recover();
    }
}
We also need to add the reference to the _errorBoundary field to the ErrorBoundary component in the template section of the MainLayout component:
<ErrorBoundary @ref="_errorBoundary"></ErrorBoundary>
Now, whenever an error occurs on the Counter page, we can navigate off the page and access any page, and the web application is fully operational.
Last but not least, the ErrorBoundary type has a MaximumErrorCount property that can be set to an integer value.
<ErrorBoundary @ref="_errorBoundary" MaximumErrorCount="50">
    <ChildContent>
        @Body
    </ChildContent>
    <ErrorContent>
        <div>@context.Message</div>
    </ErrorContent>
</ErrorBoundary>
If more exceptions occur than this number, the ErrorBoundary does not contain the errors anymore, and the yellow bar on the bottom of the application shows that the application isn’t operational anymore.
Logging Exceptions
Logging is still one of the most effective tools for monitoring software and determining where to start debugging in case of a runtime error.
Blazor is part of ASP.NET Core; therefore, using the standard ILogger interface is the default way to implement logging.
@page "/counter"
@inject ILogger<Counter> Logger

<PageTitle>Counter</PageTitle>

<h1>Counter</h1>
<p role="status">Current count: @currentCount</p>
<button class="btn btn-primary" @onclick="IncrementCount">Click me</button>

@code {
    private int currentCount = 0;

    private void IncrementCount()
    {
        Logger.LogInformation("Increment Count: {currentCount}", currentCount);
        currentCount++;
    }
}
We can inject the ILogger interface in Razor components or service implementations when implementing a Blazor web application. The default WebApplicationBuilder initializes a Console logger.
Consider the following code from a page component using Entity Framework Core to delete data.
try
{
    await ClientService.DeleteClient(client.ClientId);
    await Reload();
    Snackbar.Add($"The client {client.Name} has been deleted.",
        Severity.Success);
}
catch (DbUpdateException ex)
{
    Logger.LogError("Client could not be deleted: {exception}", ex.Message);
    Snackbar.Add($"Error during deletion of the client. {ex.Message} {ex.InnerException?.Message}",
        Severity.Error,
        options => options.RequireInteraction = true);
}
In this example of a page component in a Blazor Server application, we use a try-catch block to catch DbUpdateExceptions occurring during the deletion of a client in the database.
We show the error to the user using a Snackbar component, and we log the error using the ASP.NET Core logging mechanism with the LogError method on the ILogger interface.
Configure Logging
Using the default configuration mechanism, you can set a log level per scope, such as defined in the appsettings.json file generated using the Blazor Web App project template:
{
  "Logging": {
    "LogLevel": {
      "Default": "Information",
      "Microsoft.AspNetCore": "Warning"
    }
  },
  "AllowedHosts": "*"
}
In this configuration, the log level Information applies to all scopes that do not specify a log level. The Microsoft.AspNetCore scope has Warning as its log level. We can add scopes to get granular control over what log messages to write.
For example, when you have a problem with your online shop’s order flow, you can increase the log level for that scope and keep the other parts of the application at the regular log level.
Remember that using the correct log level for your log messages is crucial.
You want to have as much information as possible when debugging or running in development mode, and you don’t want to slow down your application running in production.
It’s best practice to only log warnings and errors in production.
Best Practices for Error Handling and Logging
The following guidelines help me with error handling and logging in every Blazor web app project:
- Use
try-catchwhere applicable. The good oldtry-catchstatement is still valuable for Blazor web development and helps with handling uncertain situations, such as IO operations. - Use proper error logging. There’s nothing worse than not knowing about errors happening in your application. The default ASP.NET Core logging mechanism is a great starting point.
- Use
ErrorBoundaryto contain UI errors. Error Boundaries help you keep the lights on by reducing the impact area of an unhandled exception. You can recover from an unhandled exception in many scenarios with a bit extra work. - Validate user input. When working with forms and user input, validate the data before processing it in your application. It is not only a security risk to process unvalidated user input, it is also a perfect source of errors.
- Handle JavaScript Interop errors. When working with the
IJSRuntimetype, enclose all calls using theInvokeVoidAsync(or similar) method with atry-catchstatement to catch allJSExceptionexceptions.
With those simple guidelines, you’ll be in a good place. You can always go further, such as integrating advanced logging frameworks or application monitoring solutions.
Conclusion
In this article, we learned about error handling and exception logging in Blazor web applications.
We learned about the ErrorBoundary type, implementing ASP.NET Core logging and the best practices for error handling and exception logging.
If you want to learn more about Blazor development, you can watch my free Blazor Crash Course on YouTube. And stay tuned to the Telerik blog for more Blazor Basics.

Claudio Bernasconi
Claudio Bernasconi is a passionate software engineer and content creator writing articles and running a .NET developer YouTube channel. He has more than 10 years of experience as a .NET developer and loves sharing his knowledge about Blazor and other .NET topics with the community.
Related Posts
Comments
All articles
Topics
Web MobileMobile
Desktop
Design
Productivity
People
