
Blazor Basics: Real-time Web Applications with Blazor WebAssembly and SignalR

Summarize with AI:
Learn how to implement SignalR for real-time communication in Blazor WebAssembly to improve the user experience.
Blazor is excellent for implementing modern, single-page web applications. The component-oriented programming model paired with the fast cross-platform .NET platform is a great choice.
One of the most underrated advantages of Blazor is that, because it runs on ASP.NET Core, we get access to all its features and libraries, such as SignalR.
In this tutorial, I will show you how to leverage SignalR to implement real-time status updates for a basic ticketing system.
There is a lot of code involved in building this application. You can access the code on GitHub.
The Requirements
We want to implement a Blazor WebAssembly application that provides users access to a support ticketing system. We will implement basic functionality, such as changing the state of a ticket.
The twist is that we want to instantly reflect the changes a single user makes to all users as it happens. It prevents multiple users from working on the same ticket and, therefore, saves resources and, eventually, costs.
We also want to persist the state change so that users connecting in the future will get the current state of the tickets.
Creating the Blazor WebAssembly Application
We implement a Blazor WebAssembly application based on the Blazor Web App project template, available with .NET 8 and later.
Make sure to select WebAssembly as the interactivity mode when creating the project and provide RealTimeTicketing as the project’s name.
We keep it simple and work with the two generated projects:
RealTimeTicketing(ASP.NET Core host project)RealTimeTicketing.Client(WebAssembly project)
There is a project reference from the RealTimeTicketing project to the RealTimeTicketing.Client project. This means that we will put all shared types into the Client project.
Hint: In a real-world application, you might want to introduce a third project a class library, put the shared code in that project and let both generated projects reference it.
Adding SignalR to the Blazor Application
Before we can add SignalR to the application, we need to reference the correct packages. There are different packages for the client and the server.
You want to install the following package to the server project:
nuget install Microsoft.AspNetCore.SignalR.CommonAnd you want to add the following package to the client project:
nuget install Microsoft.AspNetCore.SignalR.ClientWith those two dependencies added, we can now implement SingalR in the application.
Implementing a SignalR Hub
Now, let’s start coding by implementing a SignalR Hub.
A hub is a server-side component that handles incoming and outgoing communication using a persistent web socket connection. A hub allows clients to establish a connection. It’s the main component of a SingalR project.
We create a Hubs folder in the server project and create a TicketHub.cs file with the following implementation:
using Microsoft.AspNetCore.SignalR;
using RealTimeTicketing.Client.Tickets;
using RealTimeTicketing.Tickets;

namespace RealTimeTicketing.Hubs;

public class TicketHub(ITicketService _ticketService) : Hub
{
    public async Task UpdateTicket(TicketUpdate ticket)
    {
        await Clients.All.SendAsync("ReceiveTicketUpdate", ticket);
    }
}
Next, we need to provide the referenced ITicketService and TicketUpdate types.
Let’s start with the ITicketService interface and its implementation. Since it’s not the core part of this tutorial to learn about dependency injection and how to implement server-side services, I will just share the code.
I create a Tickets folder in the server project where I will place all the code related to this feature.
I create a new C# file and define the ITicketService as follows:
using RealTimeTicketing.Client.Tickets;
namespace RealTimeTicketing.Tickets;

public interface ITicketService
{
    IEnumerable<Ticket> GetTickets();
}
We need to access the Ticket type and the UpdateTicket types from both the server and the client project. Therefore, we also create a Tickets folder in the Client project and add two new files to the folder:
Ticket.cs:
namespace RealTimeTicketing.Client.Tickets;

public class Ticket(int ticketId, string title,
    DateTime created, TicketState state)
{
    public int TicketId { get; set; } = ticketId;
    public string Title { get; set; } = title;
    public DateTime Created { get; set; } = created;
    public TicketState State { get; set; } = state;
}
The Ticket type represents the data of a ticket added to the ticketing system.
TicketUpdate.cs:
namespace RealTimeTicketing.Client.Tickets;

public enum TicketState
{
    Open,
    Pending,
    Resolved,
    Closed
}

public record TicketUpdate(int TicketId, TicketState State);
The TicketUpdate type contains the information sent from the client to the server over the SignalR connection.
The UpdateTicket method in the TicketHub accepts a method parameter of type TicketUpdate. It contains the ticket ID and the state the user assigned.
In the implementation, the TicketHub sends a message with the TicketUpdate object to all connected clients.
Setting Up SignalR in the Server Project
We need to configure the server application to load the required services and run the SignalR hub.
In the Program.cs file, we register the required SignalR services using the following code:
// Register the services with the DI system
builder.Services.AddSignalR();

// Initialize the SignalR Hub and add the middleware handling the communication
app.MapHub<TicketHub>("/ticketHub");
Implementing the TicketService
Next, we want to implement the TicketService. It implements the ITicketService interface and provides default data for the application.
Hint: In a real-world application, we would most likely load the data from a database or another persistent storage.
We add a TicketService.cs file to the Tickets folder of the Server project:
using RealTimeTicketing.Client.Tickets;

namespace RealTimeTicketing.Tickets;

public class TicketService : ITicketService
{
    private readonly IList<Ticket> _tickets =
    [
        new Ticket(100, "Monitor does not display image", DateTime.Now, TicketState.Open),
        new Ticket(200, "Internet speed is slow", DateTime.Now, TicketState.Open),
        new Ticket(300, "YouTube video does not play", DateTime.Now, TicketState.Open)
    ];

    public IEnumerable<Ticket> GetTickets()
    {
        return _tickets;
    }
}
Next, we want to register the service with the dependency injection system in the Program.cs file:
builder.Services.AddSingleton<ITicketService, TicketService>();
Hint: Make sure to register the service as a singleton and not use the AddScoped method. Later, we will update the data and, therefore, need to make sure that we always use the same instance of the TicketService.
Implementing the TicketsController
Now that we have a service that we can use to load the initial data, we want to implement an API controller in the server project.
The WebAssembly client will use an HTTP client to connect to the API and load the initial data when rendering the Tickets page.
We add a new Controllers folder to the server project and create a TicketsController.cs file with the following code:
using Microsoft.AspNetCore.Mvc;
using RealTimeTicketing.Client.Tickets;
using RealTimeTicketing.Tickets;

namespace RealTimeTicketing.Controllers;

[Route("api/[controller]")]
[ApiController]
public class TicketsController(ITicketService _ticketService) : ControllerBase
{
    [HttpGet]
    public ActionResult<IEnumerable<Ticket>> GetTickets()
    {
        var tickets = _ticketService.GetTickets();
        return Ok(tickets);
    }
}
This code uses ASP.NET Core WebAPI to implement a controller. The controller implements an HTTP GET endpoint, which will be available at the /api/tickets route.
We use primary constructors, inject an instance of the ITicketService type and use its GetTickets method to load and return the tickets to the client.
We also need to add controller support to the server project. In the Program.cs file, we add the following code:
// Register the services required to use controllers
builder.Services.AddControllers();

// Add the middleware exposing the controller endpoints and handling requests
app.MapControllers();
Setting Up SignalR in the Client Project
Now that we have everything set up in the server project, we want to implement a Blazor page component, load the initial data from the server by calling the API and connect to the TicketHub using SignalR.
In the Pages folder of the Client project, we create a Tickets.razor file and implement the following page component:
We add the following definitions at the top of the file:
@page "/tickets"
@using Microsoft.AspNetCore.SignalR.Client
@using RealTimeTicketing.Client.Tickets

@inject NavigationManager Navigation
@inject HttpClient HttpClient
We make the component available at the /tickets route using the @page directive. We add using statements for the required namespaces, and we inject an instance of the NavigationManager and the HttpClient types.
Next, we create a code section using the @code directive and override the OnInitializedAsync lifecycle method.
@code {
    private HubConnection? _hubConnection;
    private IEnumerable<Ticket>? _tickets;
    private List<TicketState> _ticketStates =
        Enum.GetValues<TicketState>().ToList();

    protected override async Task OnInitializedAsync()
    {
        // to be implemented
    }
}
We create three private fields. The HubConnection is a SignalR type and will represent a client connection to a SingalR hub.
The _tickets field will hold the information about all tickets in the system. We will load this information when the user navigates to the Tickets page.
The _ticketStates field contains a list of all available ticket states. We will use this field to populate a select field in the HTML template of the component.
Now, let’s implement the OnInitializedAsync method, load the initial data from the API and connect to the SignalR hub.
if (HttpClient.BaseAddress is not null)
{
    _tickets = await HttpClient.GetFromJsonAsync<IEnumerable<Ticket>>("api/tickets");
}
We use the injected HttpClient instance and query the api/tickets endpoint. We assign the returned data to the _tickets field we previously created.
Hint: The if statement is required to filter prerendering. More about that later when registering the HttpClient in the Client project.
_hubConnection = new HubConnectionBuilder()
    .WithUrl(Navigation.ToAbsoluteUri("/ticketHub"))
    .Build();
We use the Navigation property, which is an instance of the NavigationManager type we previously injected into the Tickets page component, to build the URI for the SignalR Hub.
We registered the TicketHub type with the /ticketHub route in the Program.cs file of the server project. Make sure to use the same address in the client project to establish a connection.
Before we initialize the connection, we want to define the client-side behavior for handling the ReceiveTicketUpdate event. Remember, the event is sent to all connected clients within the TicketHub implementation.
_hubConnection.On<TicketUpdate>("ReceiveTicketUpdate", (TicketUpdate ticket) =>
{
    if (_tickets is not null)
    {
        _tickets.Single(t => t.TicketId == ticket.TicketId).State = ticket.State;
    }
    InvokeAsync(StateHasChanged);
});
We use the On method and provide the type of incoming event as the generic type argument. In our example, we provide ReceiveTicketUpdate as the name of the event and TicketUpdate as the generic type argument (as defined in the TicketHub implementation).
We use LINQ to locate the correct ticket by looking up its ID and setting the state to the state provided by the ReceiveTicketUpdate event.
We also use the InvokeAsync method to execute the StateHasChanged method on the renderer’s synchronization context to reflect the changes in the _tickets object on the screen.
Last but not least, we need to establish the connection with the SignalR hub using the following line:
await _hubConnection.StartAsync();
It’s important to close an open connection when navigating off the page. Otherwise, the connection remains open and wastes resources.
We add the following DisposeAsync method to the Tickets component:
public async ValueTask DisposeAsync()
{
    if (_hubConnection is not null)
    {
        await _hubConnection.DisposeAsync();
    }
}
Now, we’re finally ready to implement the component template code:
<h3>Tickets</h3>

@if (_tickets is not null)
{
    <table>
        <thead>
            <tr>
                <th style="width: 100px;">Ticket Id</th>
                <th style="width: 300px;">Title</th>
                <th style="width: 100px;">Created</th>
                <th style="width: 200px;">State</th>
            </tr>
        </thead>
        <tbody>
            @foreach (var ticket in _tickets)
            {
                <tr>
                    <td>@ticket.TicketId</td>
                    <td>@ticket.Title</td>
                    <td>@ticket.Created.ToShortDateString()</td>
                    <td>
                        <select class="form-select"
                                @onchange="e => UpdateTicket(ticket.TicketId,
                                   e.Value?.ToString())">
                            @foreach (var state in _ticketStates)
                            {
                                <option value="@state"
                                        selected="@(state == ticket.State)">
                                    @state
                                </option>
                            }
                        </select>
                    </td>
                </tr>
            }
        </tbody>
    </table>
}
We use an HTML table to render all items in the _tickets field we previously defined.
The interesting code is the select element rendered to represent the ticket state. We use the _ticketStates field containing all available states to render an option for each value and set the selected attribute to true for the currently selected state of the ticket.
We also use the @onchange event of the select element and call an UpdateTicket method. Let’s implement this method in the @code section of the component:
private async Task UpdateTicket(int ticketId, string? ticketState)
{
    Enum.TryParse<TicketState>(ticketState, out var state);
    if (_hubConnection is not null &&
        _hubConnection.State == HubConnectionState.Connected)
    {
        await _hubConnection
            .SendAsync("UpdateTicket", new TicketUpdate(ticketId, state));
    }
}
We get the ticket ID and the ticket state as method arguments whenever the user changes the value of the select field on the screen.
First, we use the Enum.TryParse method to get the correct enum value based on the string provided. Next, we send the UpdateTicket event to the SignalR hub and provide a new instance of the TicketUpdate object containing the ticket ID and the new ticket state.
The UpdateTicket string represents the UpdateTicket method implemented in the TicketHub. Make sure the names are the same.
Setting Up the HttpClient in the Client Project
Before we can run the application, we need to set up the HttpClient for the client project.
In the Program.cs file of the client project, we add the following code before calling the RunAsync method:
builder.Services.AddScoped(sp =>
    new HttpClient
    {
        BaseAddress = new Uri("https://localhost:7256")
    });
We register a scoped instance of the HttpClient and provide a URI as the BaseAddress of the HttpClient. Make sure to use the correct port where the server project exposes the API endpoint.
Hint: You can find the correct port in the launchSettings.json of the server project.
Because Blazor uses prerendering when the WebAssembly bundle hasn’t been loaded, we also need to add the following line to the server project:
builder.Services.AddHttpClient(); // Server project
Otherwise, the application will throw an error when directly accessing the /tickets route of the application.
Testing the Application with Real-Time Updates
Now, we are ready to build and run the application.
I added a link to the /tickets page in the NavMenu component to make it easy to navigate to the Tickets page.
<div class="nav-item px-3">
    <NavLink class="nav-link" href="tickets" Match="NavLinkMatch.All">
        <span class="bi bi-house-door-fill-nav-menu" aria-hidden="true"></span> Tickets
    </NavLink>
</div>
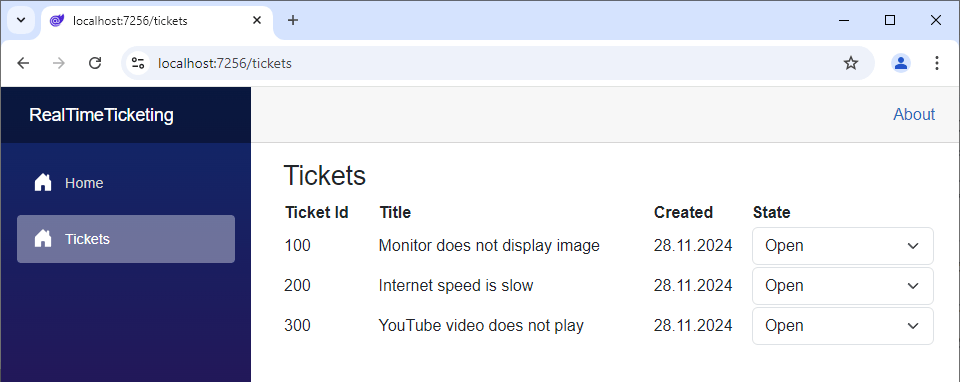
We navigate to the Tickets page, and we should see a table with all the tickets we added to the TicketService implementation.
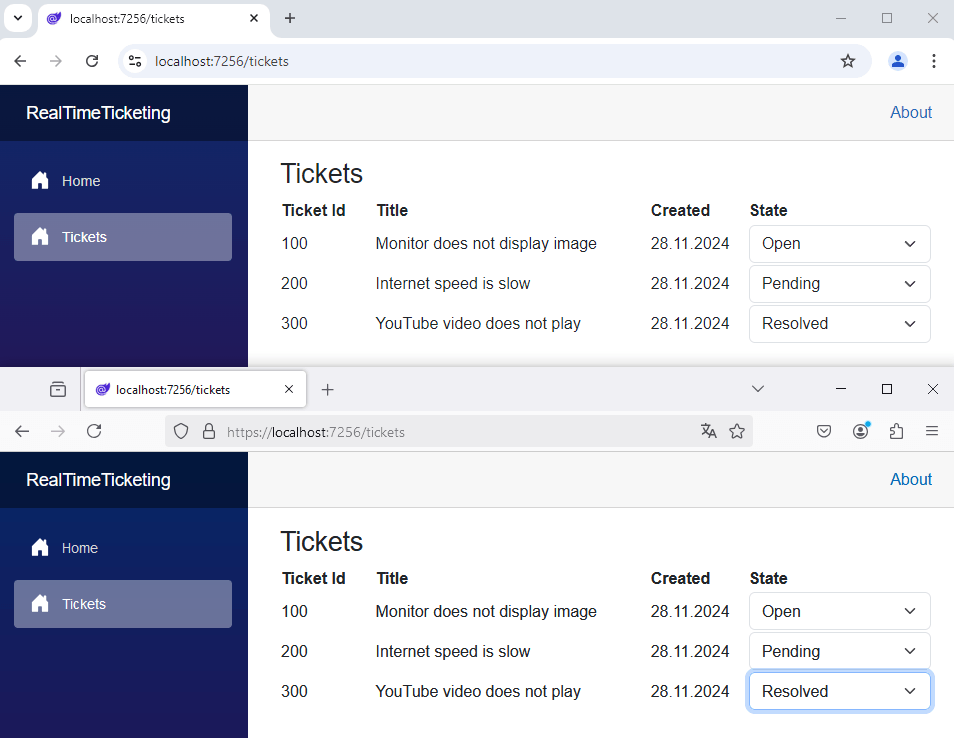
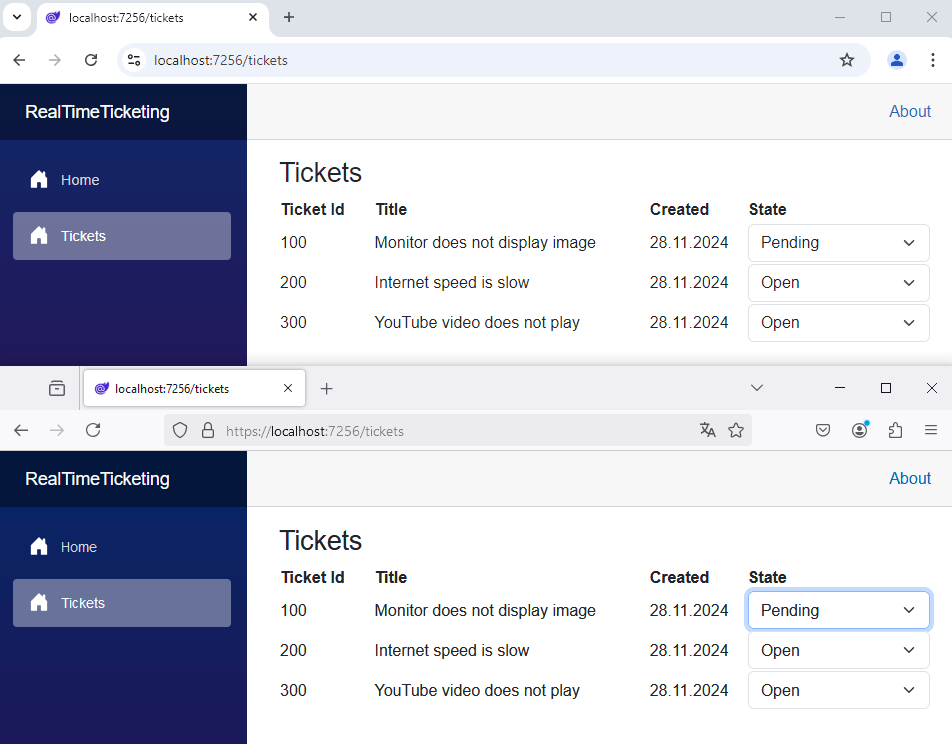
Now, we want to test the real-time functionality we implemented using SignalR. We open another browser and navigate to the same URL to open a second application instance.
When the user in the first browser changes the state of a ticket from Open to Pending, we should see that reflected almost instantly on the screen of the second user in the second browser.
Now, what happens if the user refreshes the application? I reload the second browser instance.
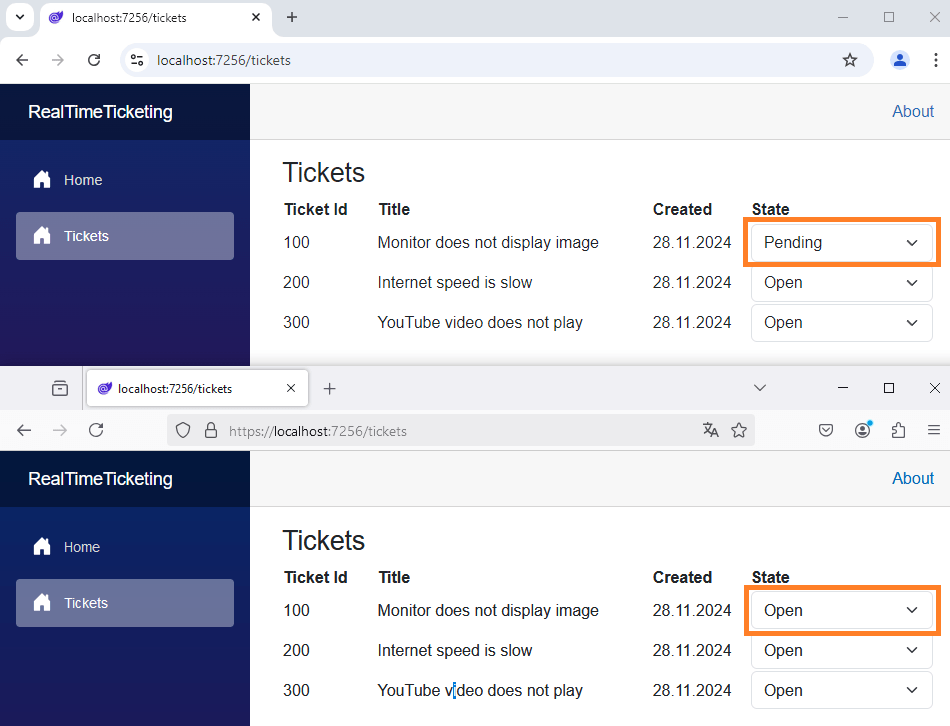
Well, the data will be loaded from the TicketService, which still contains the initial data.
Updating the Application State in the TicketService
We want to provide real-time changes to the tickets and persist the state change using the TicketService, so that new clients connecting at a later time will also get the current information.
We add a new UpdateState method definition to the ITicketService interface:
public interface ITicketService
{
    IEnumerable<Ticket> GetTickets();
    void UpdateState(int ticketId, TicketState state);
}
In the TicketService implementation, we add an implementation for the UpdateState method.
public void UpdateState(int ticketId, TicketState state)
{
    var ticket = _tickets.Single(ticket => ticket.TicketId == ticketId);
    ticket.State = state;
}
We look for the correct ticket and update the state.
Now, we change the UpdateTicket method on the TicketHub:
public class TicketHub(ITicketService _ticketService) : Hub
{
    public async Task UpdateTicket(TicketUpdate ticket)
    {
        await Clients.All.SendAsync("ReceiveTicketUpdate", ticket);
        _ticketService.UpdateState(ticket.TicketId, ticket.State);
    }
}
After we send the ReceiveTicketUpdate event to all connected clients, we use the TicketService to update the internal state.
With those server-side changes, we should now be able to get the latest information when a new client connects to the server.
This time, I leave the testing to you.
Conclusion
We learned to set up real-time communication using SignalR in a Blazor WebAssembly application. We also learned how to update the application’s internal state and provide the latest information to the clients when they connect.
This application is a great starting point for exploring SignalR’s capabilities. Think of what features you could develop for the application you’re working on right now. Almost all types of applications could benefit from real-time communication in some form or another.
If you want to learn more about Blazor development, you can watch my free Blazor Crash Course on YouTube. And stay tuned to the Telerik blog for more Blazor Basics.

Claudio Bernasconi
Claudio Bernasconi is a passionate software engineer and content creator writing articles and running a .NET developer YouTube channel. He has more than 10 years of experience as a .NET developer and loves sharing his knowledge about Blazor and other .NET topics with the community.
Related Posts
Comments
All articles
Topics
Web MobileMobile
Desktop
Design
Productivity
People
